Let Me Tell You About My Go-To Side: Oven Fried Potatoes & Onions
So the first time I tried making oven fried potatoes & onions, I was fresh out of college and living in this tiny rental with a temperamental oven that only had two settings: ‘barely warm’ and ‘sun.’ I remember calling my mom because things just weren’t crisping up, and she (after a sigh that honestly said I’ll just come over and do it myself) told me the trick was cranking up the oven and using plenty of oil. I’ve been tweaking the method ever since, and nothing says comfort to me quite like the smell of these getting golden in the oven. Sometimes I’ll just stand there and eat the crispy little bits right off the sheet pan—don’t tell the kids.

Why You’ll Absolutely Want to Make This
I make this (probably too often) when it’s one of those not-quite-a-meal nights and nobody wants salad. My family goes mad for these—especially the super crispy edges. (I’m talking full-on “dibs!” shouted across the room like it’s a sport.) Sometimes I get lazy and leave the potatoes a little chunkier, and guess what? They’re still gone by the end of dinner. You really can’t mess it up, unless you forget about them, which I have… resulting in a dark, smoky kitchen. But that’s a story for another day.
What You’ll Need (And What You Can Get Away With)
- 4-5 medium potatoes (Russets are classic, but red or Yukon Golds are less starchy and maybe even a bit fancier. My grandma always used whatever potato was on sale.)
- 1 large onion (Sweet onions are amazing here, but regular yellow works. I once threw in leeks because I ran out—surprisingly good!)
- 1/4 cup oil (I usually reach for olive, but vegetable oil crisps things faster.)
- 1-2 teaspoons salt (Coarse salt is best, but table salt’s fine. Don’t sweat it.)
- Black pepper (as much as you like. I never measure—just go wild.)
- Optional extras: Paprika, dried rosemary, or a sprinkle of garlic powder (sometimes I toss in a little smoked paprika and it feels downright fancy.)
Here’s What You Actually Do
- Preheat that oven to 220°C (around 425°F). If your oven runs hot or… does its own thing, maybe check a little early.
- Scrub the potatoes well. I like to leave the skins on—less work and more flavor. Slice ’em up, not too thick, not too thin (about the width of a pencil if you want math, but you don’t have to overthink it).
- Peel and slice the onion, kind of thick, because it shrinks more than you’d think. Lump it all together in a big bowl.
- Pour over the oil, chuck in the salt, pepper, and whatever other spices you fancy. Now’s the time to get your hands in there and toss everything around. Don’t be shy. This is where I take a second to question my life choices, because oil gets everywhere, but it’s worth it.
- Spread it all out in a single layer on a big, rimmed baking sheet. If you crowd the pan, they’re gonna steam and never crisp up. I learned this the hard way (smushed, sad potatoes—no thanks).
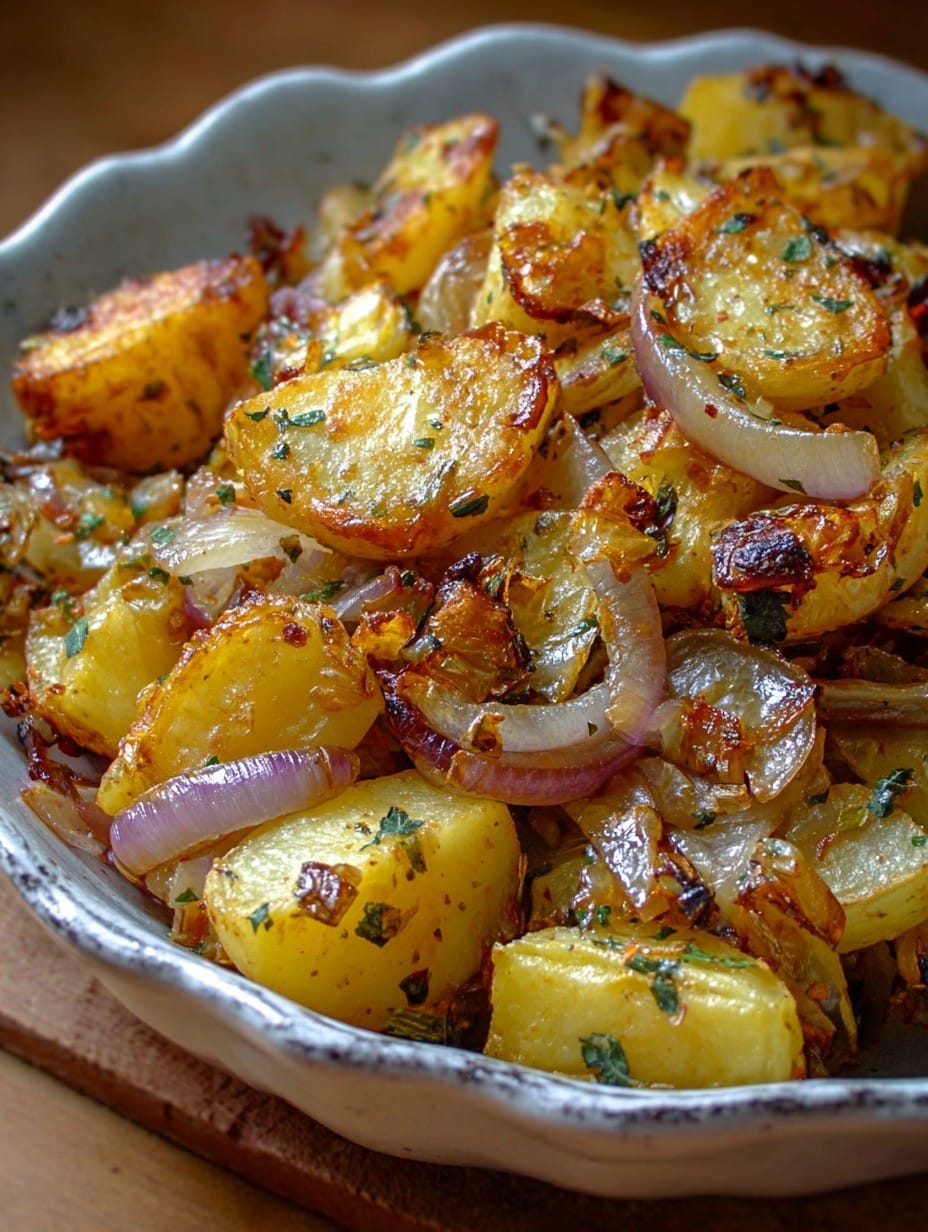
- Bake for 35–40 minutes, flipping everything about halfway through. Don’t fuss if a few stick or look a bit uneven, it’ll make some pieces extra crunchy. This is when I inevitably sneak a taste—watch your fingers!
- They’re done when golden and crisp, and the onions should almost melt in spots. Pull ‘em out, taste for salt (I usually add a pinch more), and get ready to defend your share if you’ve got hungry folks circling.
Just Some Notes from the Many Trays I’ve Made
- I used to skip lining the pan, but cleanup is so much easier with parchment or foil—unless you like picking burnt bits
for days. - Don’t stress if the onions look a bit too brown in spots. The caramelized bits are the best part! Actually, I pick those off first…
- You can totally make this in a cast iron skillet if you don’t have a baking sheet, but it might not get as crispy around the edges.
- Honestly, sometimes potatoes just won’t crisp if you cut them too thick. On second thought, I’d rather risk a bit of char for maximum crunch!
Variants I’ve Attempted (Some More Successful Than Others)
- Cheesy Version: I tried tossing parmesan on halfway through baking; it tastes amazing, but be warned—cleaning that pan is a pain.
- Sweet Potato Swap: Works, but takes about 10 minutes less to bake and isn’t quite as crispy (unless you really blast the heat).
- Bacon Bits: I added cooked bacon once, but the bacon kind of lost its crunch. Next time I’ll just sprinkle it on after.
- Eggplant Addition: Nope. Soggy city. Would not recommend. Learned my lesson.
Do You Really Need Special Equipment?
I always grab my big metal baking sheet for space. If you’re tight on pans, just use two. Seriously, even using a pizza tray works in a pinch (done it). And if you’re living without parchment, oil the pan super well, but expect a bit of sticking—it’s fine, just scrape with a spatula or, hey, a butterknife works too. Who’s judging?
How to Store—If There’s Any Left
Officially, these keep in the fridge 2–3 days in an airtight box. But, let’s be honest, in my house, leftovers are a fairy tale. If I do manage to stash some, they reheat best in a super-hot oven for 10 minutes. They lose some crunch but, you know, still taste like home.
Serving: What’s Good With These?
I tend to heap these alongside just about anything—grilled sausages, eggs (breakfast-for-dinner, anyone?), or even just with ketchup when nobody’s watching. My uncle puts a fried egg on top on weekends and claims it’s a proper meal. He’s not wrong.
Pro Tips I Learned the Messy Way
- Don’t rush the preheat. I once shoved the tray in too soon and they steamed like a sauna. Floppy, sad potatoes aren’t welcome here.
- Use enough oil! I tried to be ‘healthy’ once and skimped. Nope—just stick to the script for maximum crunch.
- Give them room (seriously), or you’ll get mush. I’ve made that mistake—still ate them, but wasn’t proud.
FAQ (Because Folks Actually Ask Me These)
- Can I make this ahead? Sort of. They’re best fresh, but I have reheated; just don’t microwave, it turns ‘em rubbery.
- What potatoes work best? Russets get that old-school golden crunch, but Yukon Golds taste fancier. Red potatoes are good if that’s what you’ve got—no harm done.
- Is peeling mandatory? Nope! I like the skins for extra flavor, plus less work (who’s got time for peeling every spud anyway?)
- Why are my potatoes sticking? This happens if there’s not enough oil or you didn’t line the pan. Next time, try parchment—guess I should’ve mentioned that sooner!
Anyway, once you make oven fried potatoes & onions a couple of times, you’ll get a feel for your oven’s quirks. Oh, and don’t walk away and call your mom for a chat—set a timer! (Ask me how I know…)
Ingredients
- 2 pounds russet potatoes, scrubbed and cut into wedges
- 1 large yellow onion, sliced
- 3 tablespoons olive oil
- 1 teaspoon garlic powder
- 1 teaspoon dried thyme
- 1 teaspoon paprika
- Salt and black pepper to taste
- 2 tablespoons chopped fresh parsley (optional, for garnish)
Instructions
-
1Preheat your oven to 425°F (220°C). Line a large baking sheet with parchment paper or lightly grease it.
-
2In a large bowl, combine the potato wedges and sliced onions. Drizzle with olive oil and toss to coat.
-
3Sprinkle the garlic powder, dried thyme, paprika, salt, and black pepper over the potatoes and onions. Toss again to distribute the seasonings evenly.
-
4Spread the potatoes and onions out in an even layer on the prepared baking sheet.
-
5Bake for 40 minutes, flipping the potatoes halfway through, until they are golden, crispy and the onions are browned.
-
6Remove from oven and garnish with chopped fresh parsley if desired. Serve hot.
Approximate Information for One Serving
Nutrition Disclaimers
Number of total servings shown is approximate. Actual number of servings will depend on your preferred portion sizes.
Nutritional values shown are general guidelines and reflect information for 1 serving using the ingredients listed, not including any optional ingredients. Actual macros may vary slightly depending on specific brands and types of ingredients used.
To determine the weight of one serving, prepare the recipe as instructed. Weigh the finished recipe, then divide the weight of the finished recipe (not including the weight of the container the food is in) by the desired number of servings. Result will be the weight of one serving.
Did you make this recipe?
Please consider Pinning it!!