If You’ve Got 20 Minutes, You Can Make These
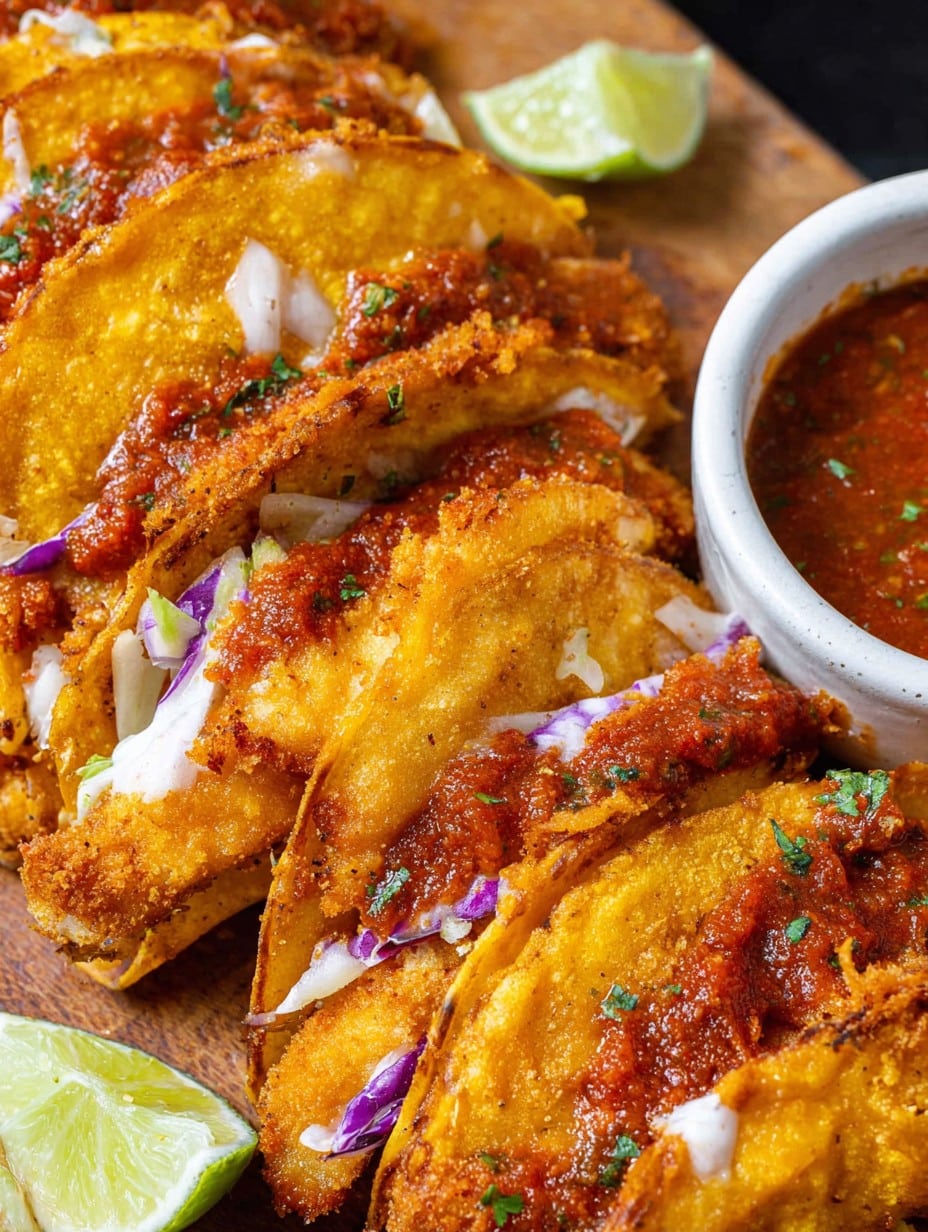
I have this vague memory of being at my cousin Molly’s place as a teenager—her kitchen smelled like fried heaven, music was playing (definitely ‘90s pop), and I remember biting into what she swore were the world’s best crispy chicken tacos. She wasn’t wrong. Now, whether it’s a random Tuesday or, you know, a day when everyone’s slightly grumpy, these tacos work their weird little magic and life feels all right—even if my kitchen ends up looking like a food tornado hit it. And honestly, I’ve learned to just accept the mess (sort of), because crispy chicken tacos are that worth it.

Why I Keep Coming Back to This Recipe
I make this when I want to feel like a weeknight hero without losing my mind. My family goes a bit bonkers for these little crispy wonders (kid-approved, spouse-approved, and neighbor-stops-by-approved). Sometimes the chicken turns out extra craggy and crunchy; sometimes it doesn’t—nobody cares. And, minor warning, cheese always tries to escape in the pan, but I’ve just let that be part of the show at this point.
What You’ll Need (and What You Can Get Away With)
- 2 cups cooked chicken breast, shredded (I chop up rotisserie chicken more than I care to admit—leftovers totally count. If you use thighs, you get extra flavor.)
- 1 tsp chili powder (or taco seasoning when I’ve run out, which is often)
- 1 tsp cumin
- 1/2 tsp garlic powder
- 1/2 tsp onion powder
- 1/2 tsp salt (or more if you’re living dangerously)
- 8 small corn tortillas (flour if that’s what you’ve got; my granny insists on fresh, but honestly, store-bought hasn’t let me down yet)
- 1 1/4 cup shredded cheese (cheddar, jack, or whatever’s in the fridge—I once used mozzarella and life went on)
- Vegetable oil, as needed for pan-frying
- Optional toppings: avocado, pico de gallo, shredded lettuce, sour cream (I skip lettuce if I’m feeling lazy… which is, uh, a lot)
Alright, Here’s How You Do It
- In a bowl, toss your chicken with chili powder, cumin, garlic and onion powder, and salt. Don’t be shy—give it a good mix. Sometimes I just use my hands; it works better for getting seasoning in all the nooks, though you might end up with orange-tinted fingers.
- Lay out the tortillas and zap them in a damp towel in the microwave for 20 seconds. (No microwave? Warm them a bit in a dry skillet. Just don’t skip this, otherwise, they’ll tear and you’ll cry. Not literally, but still.)
- Scoop a spoonful of chicken and a small handful of cheese onto half of each tortilla, then fold ‘em over. Don’t worry if they don’t close perfectly now; the cheese is basically glue once it melts.
- Heat a big pan with a slick of oil—just enough to coat. (Medium heat is best for me, though I once tried to speed it up on high and, well, smoke alarm city.)
- Place the filled tortillas in, press ’em a bit, and cook for 2-3 minutes per side, until the shells go golden and shatteringly crisp. I usually flip with tongs, but once used a fork in desperation. Risky. Oh, if filling leaks out, that’s just the chef’s extra snack.
- Transfer to a wire rack or paper towels and keep going till they’re all done. This is usually the point where I nibble on the first finished one because, come on, who has that kind of willpower?
- To serve, pile on your favorite toppings. Or none at all—that’s your business!
Notes Only a Slightly Distracted Cook Would Learn
- If your tortillas are splitting, try a bit more oil in the pan or warming them longer. I learned this the hard, sticky way.
- Don’t sweat exact spice measurements; I honestly eyeball most of them now, though my written recipe pretends otherwise.
- A little leftover taco filling is killer on nachos the next day (if by some miracle it survives).
I Messed Around with These Variations—and Survived
- Once used pulled pork instead of chicken. Success! But that time I tried tofu—hmm, not my finest hour; maybe I needed to press it more first.
- Added canned corn and black beans to the filling one night—hit or miss with the kids, but I liked it.
- For extra spice, I sometimes sneak in diced jalapeños. My brother called them “danger tacos” after one batch.
Do You Really Need Special Gear?
A big nonstick skillet makes life easier, but honestly, I’ve used a battered old frying pan and even a sheet pan in the oven (they don’t get as crisp, but it does the job if you’re feeding a crowd or the stove is covered in other projects).
How to Store ‘Em (If You Have Any Left…)
Fridge? Sure, just pop leftovers in an airtight container—though honestly, in my house, these never last more than a day! They’re best reheated in a toaster oven or dry skillet; microwave works but flattens the crunch. Not the end of the world, but just saying.
What to Eat These With? Here’s How We Usually Roll
Sometimes I serve a big bowl of guacamole and tortilla chips on the side and call it a party. Or coleslaw, if I’m feeling like I need to sneak in more veggies. Fridays, we do taco night on the couch in front of silly TV, which is pretty much a household tradition by now.
If I Could Go Back in Time, Here’s What I’d Tell Myself
- I once tried to crisp twice as many tacos in one pan—don’t. They steam instead of crisping (plus flipping them gets… interesting).
- Letting them rest on the wire rack instead of stacking them is worth it. Seriously. They keep their crunch. If you skip it, don’t say I didn’t warn you.
- Actually, I find a little extra cheese inside helps glue everything together, but don’t pile it too high or it’ll all escape like a cheese avalanche.
Questions I Actually Get Asked
- Can I bake instead of pan-fry? Yes, but not as crispy. If your pan’s missing in action, oven at 425°F (220°C), brush with oil, bake 10 min, flip, bake 7 min more. It works, just expect a different kind of crunch.
- Flour tortillas or nothing? Hey, I use flour when I’m out of corn—the world keeps on spinning. They brown differently but hold together a bit better sometimes. Totally legal.
- What’s the best cheese? If it melts, it works (I used vegan cheese once and it wasn’t half bad, though my uncle Tim didn’t agree). Cheddar and Monterey Jack are my go-to’s. Pepper Jack if you want that zip.
- Toppings—essential? Not at all! I once ate them plain standing over the sink. But avocado and fresh salsa are never a bad idea.
- Can I freeze ‘em? I suppose so, but they’re just not the same after. Kinda like trying to re-live a holiday—some things are just meant to be enjoyed in the moment. Or maybe I haven’t figured out the trick yet.
Oh, also, totally unrelated, but has anyone else noticed how taco night just kind of makes people show up in the kitchen right when you’re about to eat? There must be some rule of the universe. Anyway, enjoy these crispy chicken tacos—no perfection required.
Ingredients
- 2 boneless, skinless chicken breasts (about 12 oz)
- 1 cup all-purpose flour
- 2 large eggs
- 1 cup panko breadcrumbs
- 1 teaspoon chili powder
- 1/2 teaspoon garlic powder
- 8 small corn tortillas
- 1 cup shredded lettuce
- 1/2 cup diced tomatoes
- 1/4 cup sour cream
- Vegetable oil for frying
- Salt and pepper to taste
Instructions
-
1Cut the chicken breasts into thin strips. Season with salt, pepper, chili powder, and garlic powder.
-
2Set up a breading station: place flour in one bowl, beaten eggs in another, and panko breadcrumbs in a third bowl.
-
3Dredge each chicken strip in flour, dip in egg, then coat with panko breadcrumbs.
-
4Heat 1 inch of vegetable oil in a large skillet over medium-high heat. Fry chicken strips in batches 3-4 minutes per side, or until golden and cooked through. Drain on paper towels.
-
5Warm corn tortillas in a dry skillet or microwave. Fill each tortilla with crispy chicken, shredded lettuce, diced tomatoes, and a dollop of sour cream.
-
6Serve immediately and enjoy your crispy chicken tacos.
Approximate Information for One Serving
Nutrition Disclaimers
Number of total servings shown is approximate. Actual number of servings will depend on your preferred portion sizes.
Nutritional values shown are general guidelines and reflect information for 1 serving using the ingredients listed, not including any optional ingredients. Actual macros may vary slightly depending on specific brands and types of ingredients used.
To determine the weight of one serving, prepare the recipe as instructed. Weigh the finished recipe, then divide the weight of the finished recipe (not including the weight of the container the food is in) by the desired number of servings. Result will be the weight of one serving.
Did you make this recipe?
Please consider Pinning it!!




