Alright, let’s Talk Baked Protein Pancake Bowls (No Banana in Sight!)
Hey there! So, you know those mornings where you want a pancake but honestly can’t be bothered with a frying pan (or, let’s be real, more than one dirty bowl)? That’s basically how these baked protein pancake bowls were born. The first time I made these, I forgot to buy bananas (typical), improvised with what I had, and—happy accident—they turned out better than I expected. The kitchen smelled amazing, my cat was suspicious, and well, my partner stole half my batch “for his lunches” but if sharing isn’t love, I don’t know what is!

Why This Recipe is Such a Winner
I throw these together when I need something quick for breakfast but want it to actually fill me up. My family gobbles them up (even my picky sister, who claims “protein” anything tastes weird). If you’re stuck in the cereal trap and want real food, they’re a lifesaver. Oh, and zero bananas, so no lingering question of “do I taste banana?” Sometimes I toss in a handful of berries if I’m feeling fancy—or if the fruit bowl’s looking sad.
Your Ingredient Hit List (and Some Swaps!)
- 1 cup oat flour (When I’m out I blitz regular old-fashioned oats, honestly any oats will do. Granny swears by Bob’s Red Mill but I say whatever’s cheapest.)
- 1/2 cup vanilla protein powder (Whey or plant-based, totally up to you. Spotted a birthday cake flavor once… didn’t love it.)
- 1 tsp baking powder (Don’t mix it up with baking soda. Made that mistake—too salty, too flat!)
- Pinch of salt (I mean, I just shake it in, don’t stress precise measuring)
- 2 eggs (I’ve used flax eggs in a pinch; a bit more crumbly but still good)
- 3/4 cup milk of choice (Almond, oat, or dairy; my go-to is oat because it’s usually in the fridge but it’s all good)
- 2 tbsp maple syrup or honey (Sometimes swap in agave or a rogue squeeze of golden syrup from the back cupboard)
- 1 tbsp melted coconut oil or butter (I just nuke it, might be a bit more or less, depends how generous the spoonful feels today)
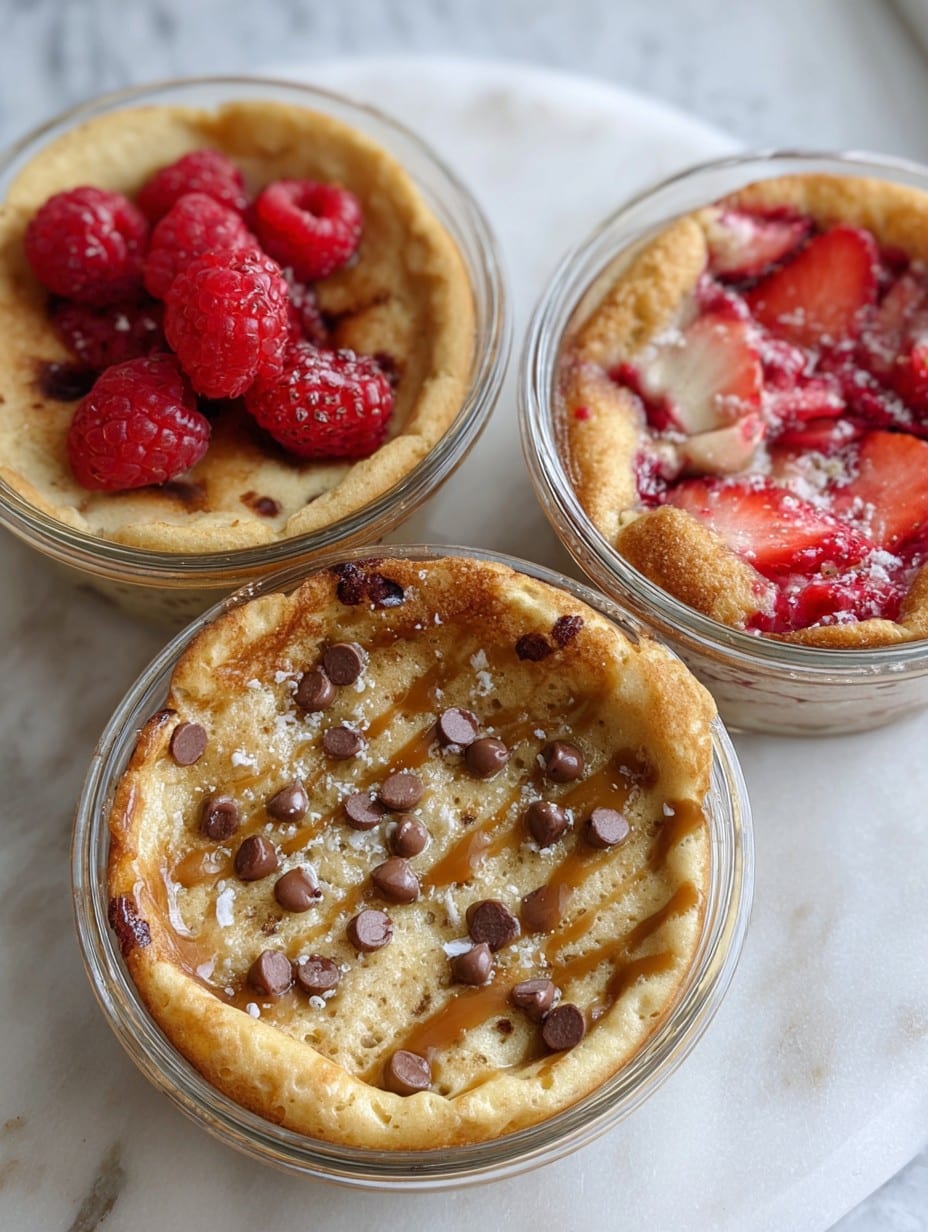
- 1/2 cup berries or choc chips (Optional, toss ‘em in if you’re feeling wild. Diced apple works, too.)
The Kinda-Precise, Kinda Laid-Back Directions
- Preheat your oven to 350°F (about 175°C, or a medium oven for us weirdos who guess by feel). Grab a muffin tin, or some oven-safe bowls/ramekins if those are nearer to hand. Grease ‘em up, or use liners if you can be bothered.
- In a big bowl, chuck in your oat flour, protein powder, baking powder, and salt. Give it a whisk—or a good fork stir if you can’t find your whisk (mine’s always missing, probably hiding with my Tupperware lids).
- In another bowl, mix eggs, milk, maple syrup/honey, and melted oil/butter. Don’t stress if the oil’s a bit chunky, just beat energetically and call it rustic.
- Pour the wet into the dry stuff. Stir till just combined; don’t panic if it looks lumpy right now—it always sorts itself in the oven. Add in your berries or choc chips if using (this is usually when I sneak a taste. Perks of egg safety if you use flax eggs!).
- Scoop the batter into your bowls or muffin tin, about 2/3 full. You’ll probably get 6-8 depending on how generous your scoops are. Tap the tray to level things off a bit, unless you like peak-y tops (which are honestly charming).
- Bake for 18-22 minutes, or until they look lightly golden and a toothpick comes out clean—though sometimes I ignore the toothpick and just poke them until they bounce back. I mean, who has time for washing extra skewers?
- Let them cool a few minutes if you can wait. But honestly, they’re lovely warm. Don’t be alarmed if they seem puffed up and then deflate a little—normal as my Aunt Margaret’s baking disasters.
Notes (a.k.a. The Honest Bits)
- Don’t overmix—when I do, they get a bit tough. But if I under-mix, there are oat flour pockets, so, somewhere in the middle?
- If the batter seems way too thick, just splash in extra milk. Weather and protein powder brand definitely play tricks with texture.
- Once, I tried baking these in a huge dish and cutting squares… It was a bit too gummy in the center for me (edges were great, though).
It’s Fun to Mix Things Up (Variations Worth Mentioning)
I’ve tossed in lemon zest and frozen blueberries – surprisingly zingy. Once swapped all the milk for strong coffee on a dare (don’t recommend, unless you’re *really* into espresso flavor at 7 a.m.). Sliced almonds on top look fancy if company’s coming. Oh! Pumpkin puree instead of some milk is a solid autumn switch. But note: if you try adding grated carrot, it tasted a bit odd. Maybe more spice would’ve helped?
If You Don’t Have All the Gear…
You can totally bake these in oven-safe mugs or even small Pyrex containers. Once used cupcake wrappers in a baking dish—bit frilly but worked! Don’t have a whisk? I said it before, but a fork does fine (just wash it quick before stuff dries).
Storage Smarts (From Someone with Hungry Housemates)
They’ll keep in the fridge for 3-4 days in a sealed container, or freezer for a month. But, at least in my place, they barely ever make it past lunchtime because someone “just wanted to check if they tasted OK.” If you freeze ‘em, defrost overnight or microwave straight from the freezer. They’re still good, just a bit denser.
How I Love to Serve (and Eat) Them
Warm with a dollop of Greek yogurt—chef’s kiss. My nephew likes his with strawberry jam; I prefer a drizzle of peanut butter. Sometimes, if I’m really running late, I just grab one and eat it on the bus (bit messy, but worth it). And on Sundays, we pile a bunch in a bowl with fruit and call it “deconstructed trifle,” which cracks us all up.
Lessons Learned (So You Don’t Make My Mistakes!)
- Don’t skip greasing your tins – once, I thought liners would suffice, but the sticking was next-level.
- I once tried mixing everything in a single bowl to save on washing up. Batter was streaky, and the pancakes baked lopsided. Now I just suck it up and use two bowls.
- Let them cool a bit before removing, or they might break apart. Been there, mopped up the crumbs.
FAQ Time – Your Actual Questions (Sort Of)
- Do I have to use protein powder? Nope! Just swap for extra oat flour and maybe whisk in a splash more sweetener. Texture’s a bit different, more muffin-y. Actually, it’s pretty good that way, too.
- Can I make these dairy-free or vegan? Yes! Use plant milk and flax eggs. Watch the bake time; they sometimes need a few minutes longer. And honestly, sometimes they look a bit pale but taste fine.
- What if I only have self-raising flour? Sure, use it, but skip the baking powder. It rises a bit more but hey, more height never hurt anyone.
- Is it normal if they’re… kinda flat in the middle? Oh, for sure. Without all that banana or crazy rise, they settle a touch after baking. More space for toppings, I say!
- Can kids help? Absolutely, though last time my niece got more flour on the dog than in the bowl. Worth it for the giggles.
So there you go! A breakfast routine-changer in a bowl (or a muffin cup, or a random mug). If you try them, let me know your wildest flavor mashups. Unless you make that coffee one – then maybe just keep that to yourself, ha!
Ingredients
- 1 cup rolled oats
- 1 scoop vanilla protein powder
- 2 large eggs
- 1 cup unsweetened almond milk
- 2 tablespoons maple syrup
- 1 teaspoon baking powder
- 1/2 teaspoon ground cinnamon
- 1/4 teaspoon salt
- Optional: 1/4 cup fresh berries or chocolate chips
Instructions
-
1Preheat oven to 350°F (175°C) and lightly grease four oven-safe bowls or ramekins.
-
2In a blender or food processor, blend rolled oats into a fine flour.
-
3In a large bowl, combine oat flour, protein powder, baking powder, cinnamon, and salt.
-
4In a separate bowl, whisk together eggs, almond milk, and maple syrup. Pour wet ingredients into dry ingredients and mix until well combined.
-
5Divide the batter evenly among the prepared bowls. Top with berries or chocolate chips, if desired.
-
6Bake for 22-25 minutes, or until the centers are set and tops are golden. Let cool slightly before serving.
Approximate Information for One Serving
Nutrition Disclaimers
Number of total servings shown is approximate. Actual number of servings will depend on your preferred portion sizes.
Nutritional values shown are general guidelines and reflect information for 1 serving using the ingredients listed, not including any optional ingredients. Actual macros may vary slightly depending on specific brands and types of ingredients used.
To determine the weight of one serving, prepare the recipe as instructed. Weigh the finished recipe, then divide the weight of the finished recipe (not including the weight of the container the food is in) by the desired number of servings. Result will be the weight of one serving.
Did you make this recipe?
Please consider Pinning it!!




