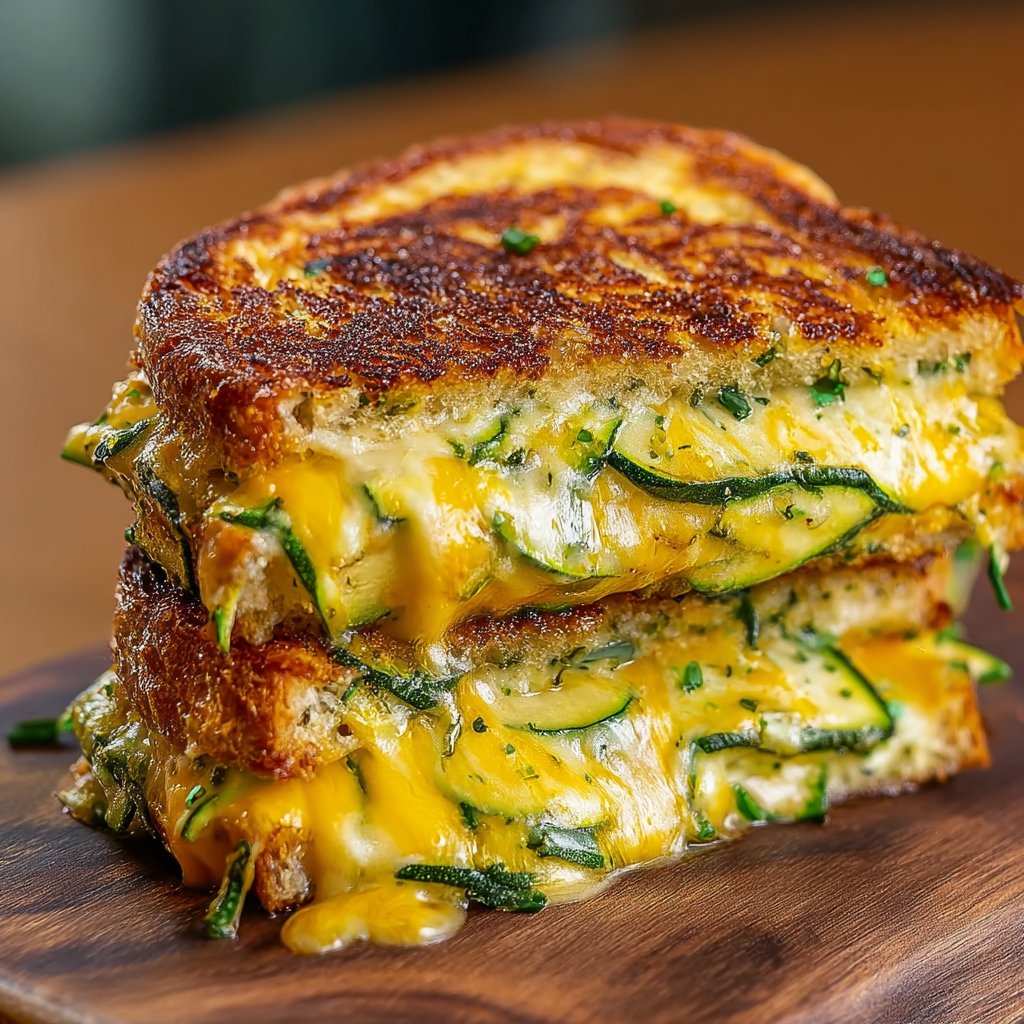
Catching Up Over Comfort Food: Zucchini Grilled Cheese
You ever just crave grilled cheese, but then remember your fridge is kind of a disaster and the bread’s gone slightly stale? Yeah, me too. This is exactly how my slightly odd (but, trust me, delicious) take on classic grilled cheese was born. Zucchini Grilled Cheese—basically the sandwich that saves lunch when my veggie drawer is overflowing, but I still want that warm, gooey bite. The first time I made it, I was honestly just trying to use up that gigantic zucchini my neighbor left on the porch (seriously, why do people grow such monstrous ones?) and now this has become my sneaky way of getting extra veggies in between all that cheese.
Why You’ll Love This (or at Least Not Regret Making It)
I tend to make this on those days when I want something cozy but also, like, feel vaguely responsible for getting a serving of greens. My family goes a bit bonkers for this because, well, cheese. But quietly, I also love that the zucchini makes it feel less heavy. If picky eaters sniff out the green bits, just call it “farmhouse style”—that trick somehow works. Also, I once burnt the heck out of the first round, but the cheese was still unstoppable. What I’m saying is, it’s forgiving.
What You’ll Need (Maybe Raid the Fridge)
- 1 big zucchini (2 smaller ones work too; I sometimes throw in yellow squash instead if I have it)
- 2 eggs (or even just 1 if you’re running low; works surprisingly fine)
- 3/4 cup shredded mozzarella (my gran used to say only use the block kind, but really, pre-shredded—whatever you’ve got works)
- 1/2 cup shredded cheddar or gouda for a deeper flavor
- 1/3 cup flour (I swap in almond flour now and again, for no real reason—just to mix things up)
- Salt and pepper—a pinch each, but honestly, go wild
- Butter (for the pan; olive oil is a fair stand-in but, I mean, butter is… butter)
Optional extras? A couple chopped green onions, fresh basil, or even diced ham if you want the sandwich to feel fancy.
Making It Happen (It’s More Fun Than You’d Think)
- Prep the zucchini: Grate that zucchini (no need to peel, unless the skin bothers you). Pile it in a clean kitchen towel and wring out as much moisture as you possibly can. If some stays, eh, life goes on. This is where I usually get impatient and give up after a minute.
- Mix it up: Toss the zucchini, eggs, both cheeses, flour, salt, and pepper in a big bowl. Smells a bit funky right now, right? It’ll get better—promise. Stir until you get a slightly sticky mixture.
- Form your “bread”: Heat a large nonstick skillet over medium. Dollop out the mixture to form 4 rough oval “bread slices,” about 1/2 inch thick. If they don’t look like slices, that’s totally fine. Shape ’em with a spatula. Fry for 5–6 minutes each side until golden and set. Don’t worry if they look wonky at this stage; they always do in my kitchen. It’s part of the charm.
- Fill and finish: Remove the “zucchini bread” from the pan. Slap a generous layer of cheese between two pairs to make sandwiches. Pop them back into the pan with a blob of butter and cook, pressing gently, until the cheese inside is meltingly gooey and the outsides are deep golden. This is when I start impatiently poking the sides just to see if they’ve stuck together yet.
Little Notes from My Kitchen Blunders
- If you skip squeezing the zucchini dry, things do get a bit soggy (learned that the hard way, more than once)
- Don’t be shy about adding more cheese. Or less. Or “accidentally” sampling half while waiting.
- Too much flour makes it kinda pasty. You want it to just hold together, not turn into a rubber boot.
Variations Worth Trying (Some Not So Much…)
- Swap in pepper jack for a spicy bite—made it once when I was out of cheddar and everyone loved it.
- Try adding thin tomato slices in the center; actually, sometimes this makes it a bit watery, so pat those dry first!
- I once tried adding spinach. Honestly? Not my favorite—texture got a little odd, but maybe you’ll love it!
Gadgets? Maybe. Or Just Wing It
Grater’s pretty essential for the zucchini. But if you haven’t got one, I’ve peeled thin slices with a potato peeler before—takes longer but works in a pinch. And if your nonstick skillet is on the fritz, just use extra butter and keep an eye on things. Oven broiler also works if the whole flipping thing gives you anxiety (like it sometimes does for me).
How Long Will It Last?
Okay, to be honest, leftovers are rare. But if you’ve got superhuman willpower, these keep in the fridge up to two days, best reheated in a skillet. Gets a bit soggy in the microwave, but not the end of the world. Honestly though, in my house it never lasts more than a day!
How I Like To Serve It (You Do You!)
My absolute favorite? With a bowl of tomato soup. My kids dunk, I like mine just on the side (less mess, you know).
Goes pretty nicely with a side salad or a sprinkle of chili flakes if you want to jazz things up. And, confession—sometimes I add a squirt of sriracha right on top.
Real-Deal Pro Tips (a.k.a. My Past Flops)
- I once tried rushing the “bread” part—didn’t let it brown enough, and it just fell apart. Slow and steady here.
- Don’t overload with cheese in the middle (I mean, it’s tempting, but it’ll ooze out everywhere and make a right mess. Not terrible but, you know, messy.)
- Give the zucchini slices plenty of space in the pan. Tried cramming too many in once and got a big, stuck-together mess.
Questions Folks Ask Me (And Some They Probably Wish They Hadn’t)
- Can I use frozen zucchini? You could, but honestly, it’s a bit wetter than you expect. Squeeze out as much liquid as you humanly can. I learned this the hard way—sog city!
- Does this really taste like grilled cheese? Not exactly, but that’s half the fun. It’s got a cheesy, golden crust and the mood of a grilled cheese, but with a veggie secret. (My toddler hasn’t noticed yet.)
- Can I bake instead of fry? You can! But actually, I find it works better if you just stick with the skillet. Flavors get richer and the finish is crispier. (If you want oven inspo, Serious Eats has awesome grilled cheese ideas.)
- What’s a good dipping sauce? I love classic tomato soup, but my pal swears by mixing Greek yogurt with herbs. Oh, and check this tomato soup from Delish if you want to make your own.
- Can I freeze? Eh, not my fave. Taste is mostly fine but the texture gets a bit weird. Good for emergencies, not dinner guests.
- What cheese is best? Whatever you’ve got. But if pressed, mozzarella plus a sharp cheddar does the trick for me.
And, you know, I was going to tell a story about a time I dropped an entire stack of these on the floor, but… maybe I’ll save that embarrassment for another time. Just, uh, don’t try to balance four at once is all I’m saying.
P.S. If you’re looking for more veggie-packed twists on old favorites, I get loads of inspiration from Half Baked Harvest. She’s honestly brilliant when I can’t decide what to do with whatever’s left in my fridge.

Ingredients
- 2 medium zucchinis, grated
- 1 large egg
- 1/3 cup all-purpose flour
- 1/2 cup grated Parmesan cheese
- 1 cup shredded mozzarella cheese
- 1/2 teaspoon garlic powder
- 1/2 teaspoon salt
- 1/4 teaspoon black pepper
- 1 tablespoon olive oil
Instructions
-
1Preheat oven to 425°F (220°C) and line a baking sheet with parchment paper.
-
2Squeeze excess moisture from the grated zucchini using a clean kitchen towel.
-
3In a large bowl, combine zucchini, egg, flour, Parmesan cheese, garlic powder, salt, and black pepper. Mix to form a dough.
-
4Divide the mixture into 8 portions and shape into rectangles on the prepared baking sheet to form the ‘bread’ slices. Bake for 15 minutes or until golden and firm.
-
5Remove from oven, let cool slightly, then assemble 4 sandwiches by placing mozzarella cheese between two zucchini bread slices each.
-
6Heat olive oil in a skillet over medium heat. Cook sandwiches for 2-3 minutes per side until cheese is melted and the outside is crispy. Serve warm.
Approximate Information for One Serving
Nutrition Disclaimers
Number of total servings shown is approximate. Actual number of servings will depend on your preferred portion sizes.
Nutritional values shown are general guidelines and reflect information for 1 serving using the ingredients listed, not including any optional ingredients. Actual macros may vary slightly depending on specific brands and types of ingredients used.
To determine the weight of one serving, prepare the recipe as instructed. Weigh the finished recipe, then divide the weight of the finished recipe (not including the weight of the container the food is in) by the desired number of servings. Result will be the weight of one serving.
Did you make this recipe?
Please consider Pinning it!!