Let’s Chat About Freezer-Friendly Green Chili Burritos
Okay, real talk—these Easy Make-Ahead Green Chili Burritos have saved my skin on more than a few of those days when dinner sneaks up out of nowhere (like, how does that even happen?). A few years back, my husband came home starving after his late shift, and all we had in the freezer were some ancient fish sticks and a single lonely ice pop. Ever since then, I keep a stash of these burritos handy. They’re hearty, packed with that slightly tangy warmth of green chiles, and let’s be honest: it’s a beautiful thing not having to turn into a short-order cook after a long day. Oh, and when my little brother comes to visit, he tries to swipe a couple for the road—says they’re better than the burrito place down on South Ave. (Not that it’s a competition, but I’ll take the win!)

Why I Keep Coming Back to This Recipe
I make these any time I spot green chiles on sale, honestly. My crowd loses their minds over them, especially after soccer practice or when we’ve, yaknow, gone a bit feral after skipping lunch. I’ll admit: I used to roll my eyes at bulk cooking, thinking it’s just one of those Pinterest dreams, but these actually come together pretty easily (once you accept a little mess). It took me a few tries to not, uh, overstuff and split the tortillas—now I just embrace it if one or two get a bit wonky. (Just eats the same!)
Ingredients You’ll Need (and a Few Swaps)
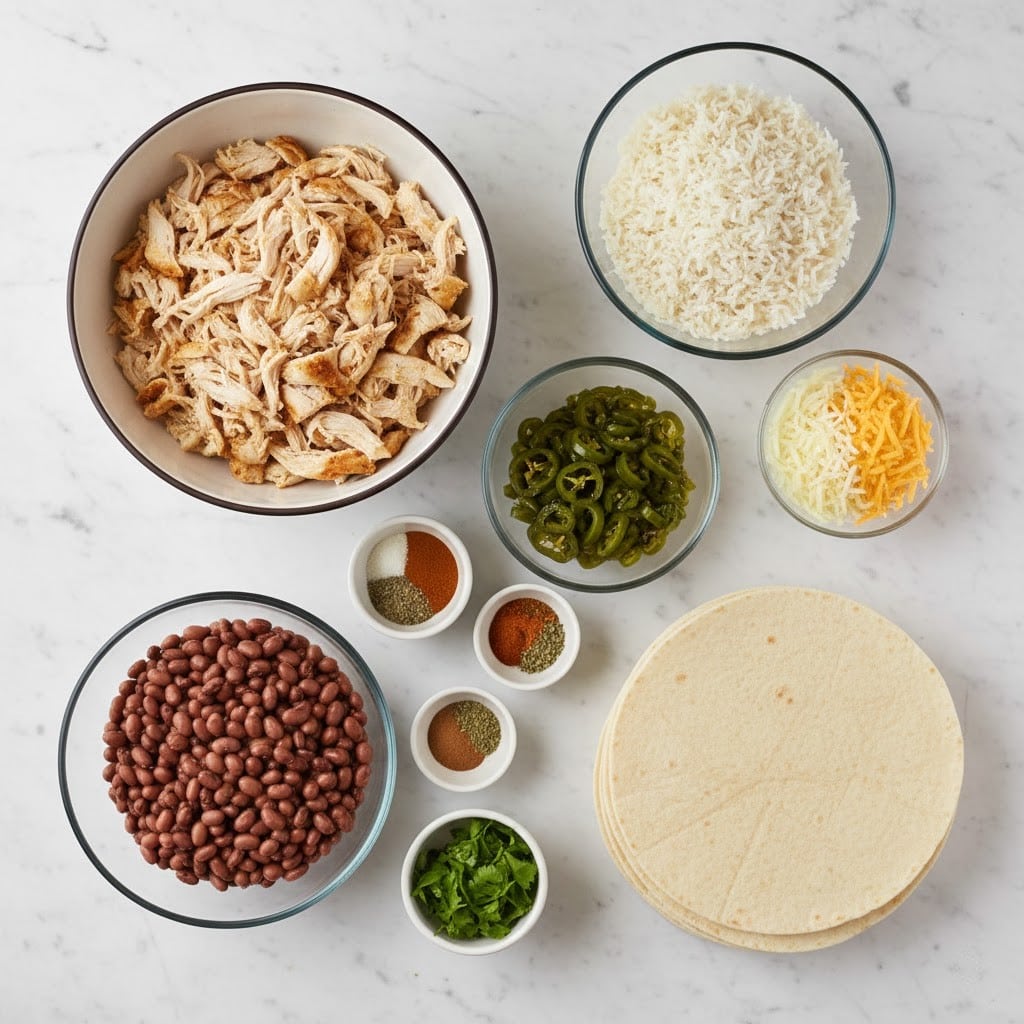
- 2 cups cooked shredded chicken (rotisserie chicken works fine, and sometimes I use leftover pork if that’s hanging around)
- 1 can (15 oz) pinto beans, drained (But hey, black beans or even refried beans will do if you’re low on pinto—my grandma always insisted on pintos though, so…)
- 1 can (4 oz) chopped green chiles (if you’re feeling spicy, toss a little diced jalapeño in too!)
- 1 1/2 cups shredded cheese (cheddar, Monterey Jack, or whatever’s hanging out in your cheese drawer—it’s all good)
- 1/2 cup sour cream (sometimes I use Greek yogurt if I’m feeling virtuous, but honestly, sour cream just hits right)
- 1/2 teaspoon garlic powder
- 1/2 teaspoon ground cumin
- Salt and pepper to taste
- 8 large flour tortillas (10-inch; I’ve used smaller once, just got more burritos and less filling—shrug)
- Optional: handful chopped cilantro, a squeeze of lime juice
How to Throw These Together (Without Losing Your Mind)
- Mix together the chicken, beans, green chiles, cheese, and sour cream in a big bowl. Add in the garlic powder, cumin, and a little salt and pepper. Give it a good stir—this is about the time I sneak a taste, just to “check for seasoning.” Sometimes I overdo it and have to grate more cheese. Oops.
- Warm your tortillas for about 15 seconds in the microwave (covered with a damp paper towel, or kitchen towel if you’re out of paper). If you skip this, they sometimes crack when rolling—ask me how I know.
- Spoon about 2/3 cup of filling into the center of each tortilla. Roll them up like you mean it: tuck the sides, then roll from the bottom up. Don’t fret if one’s a little lopsided, just tuck it in the middle of the pile later!
- Line a baking sheet with parchment and set out your burritos seam side down. If you’re freezing, pop them in the freezer for about an hour so the insides firm up a smidge. If not, just proceed to the next step.
- Wrap burritos individually in foil or plastic wrap. (Actually, I find foil is better for reheating directly in the oven, but both work.) Pop into a freezer bag, label with a sharpie if you’re organized (I usually forget and play ‘what’s this burrito?’ later).
- When you’re ready to eat, either bake from frozen in foil at 375°F for about 30-35 minutes or microwave (unwrapped) for 3-4 minutes. If you want crispy tortillas, unwrap and bake the last 10 minutes. And yes, sometimes my microwave leaves a cold spot—just let it rest a minute and it sorts itself out.
Some Lessons Learned the Hard Way (Notes)
- Don’t try to cram in extra filling. I tried, and had a volcano burrito situation in my freezer—that’s a mess I wouldn’t wish on anyone.
- If you use low-moisture cheese, the filling gets a little dry on reheating. Maybe toss in an extra spoon of sour cream or salsa.
- The beans sometimes fend to settle at the bottom, so give the filling another good stir before you start rolling—it helps.
Wild Experiments and Variations
- Once I swapped out chicken for leftover brisket. Flavor bomb. Highly recommend.
- Tried swapping flour tortillas for corn—eh, they cracked everywhere. Not my best idea, unless you like mini taquitos.
- Shredded zucchini: surprisingly good, but made the filling a bit too wet. Maybe press it out first. Or just skip it!
Equipment I (Usually) Use
- Big mixing bowl (If you don’t have one, a clean stock pot works—don’t ask me how I know)
- Baking sheet for flash freezing (Otherwise just use a big plate or whatever fits in your freezer—makes you more creative!)
- Foil or plastic wrap
- Freezer bags for storage (sometimes I use a big old container if bags are running low)
How to Store—and A Real-Life Confession
So technically these last about 2-3 months in the freezer (wrap well). But in my house? If they make it a full week, it’s some sort of minor miracle. Hungry teenagers can sniff them out like bloodhounds. In the fridge, leftovers do fine for 3-4 days.
When It’s Time to Eat: My Favorite Way
Honestly, we just plop these on a plate with a dollop of salsa and extra sour cream. Sometimes a handful of chopped cilantro if I’m feeling fancy. Oh, and a little shredded lettuce if it’s around. My sister likes hers with hot sauce (so much that her eyes water), but I can’t handle that kind of chaos.
Pro Tips—Here’s What Not to Mess With
- Don’t rush reheating—once I thought less time in the oven would be fine. Nope. The middle was still icy and the cheese was only sorta melted. Lesson learned. Give it the full time.
- Keep a stash labeled (if you can)—I’ve taken a bite of “mystery burrito” more times than I’d like to admit.
Got Questions? You’re Not Alone
- Can I use ground beef instead of chicken? Oh totally. Just brown it up, drain the fat, then swap in for the chicken. The filling’s totally flexible. I’ve even used shredded beef once (so good).
- Is it okay to freeze with sour cream in the filling? Yep. It melts right in during baking—never noticed anything funny texture-wise. Greek yogurt works too.
- Any way to make them spicier/less spicy? For more burn, throw in jalapeños or some hot sauce. If you need it milder, use half the green chiles or just skip them (but you’ll miss that kick, just saying).
- Can I bake them all at once for a crowd? I have! Line them up in a 9×13 baking dish, cover with foil, and bake. You can even smother with more cheese or sauce if you want—that’s my party trick.
- What if my tortillas keep splitting? Steam/warm them first (microwave works fine). Cold tortillas = sassy, stubborn tortillas.
Oh, and totally unrelated, but if you ever run out of tortillas mid-prep, I’ve been known to just pile the filling onto a bed of lettuce and call it a “burrito bowl.” Not nearly as satisfying, but it gets the job done when you’re in a pinch. There it is, my not-so-secret freezer burrito playbook—happy meal prepping!
Ingredients
- 2 cups cooked shredded chicken (rotisserie chicken works fine, and sometimes I use leftover pork if that’s hanging around)
- 1 can (15 oz) pinto beans, drained (But hey, black beans or even refried beans will do if you’re low on pinto—my grandma always insisted on pintos though, so…)
- 1 can (4 oz) chopped green chiles (if you’re feeling spicy, toss a little diced jalapeño in too!)
- 1 1/2 cups shredded cheese (cheddar, Monterey Jack, or whatever’s hanging out in your cheese drawer—it’s all good)
- 1/2 cup sour cream (sometimes I use Greek yogurt if I’m feeling virtuous, but honestly, sour cream just hits right)
- 1/2 teaspoon garlic powder
- 1/2 teaspoon ground cumin
- Salt and pepper to taste
- 8 large flour tortillas (10-inch; I’ve used smaller once, just got more burritos and less filling—shrug)
- Optional: handful chopped cilantro, a squeeze of lime juice
Instructions
-
1Mix together the chicken, beans, green chiles, cheese, and sour cream in a big bowl. Add in the garlic powder, cumin, and a little salt and pepper. Give it a good stir—this is about the time I sneak a taste, just to “check for seasoning.” Sometimes I overdo it and have to grate more cheese. Oops.
-
2Warm your tortillas for about 15 seconds in the microwave (covered with a damp paper towel, or kitchen towel if you’re out of paper). If you skip this, they sometimes crack when rolling—ask me how I know.
-
3Spoon about 2/3 cup of filling into the center of each tortilla. Roll them up like you mean it: tuck the sides, then roll from the bottom up. Don’t fret if one’s a little lopsided, just tuck it in the middle of the pile later!
-
4Line a baking sheet with parchment and set out your burritos seam side down. If you’re freezing, pop them in the freezer for about an hour so the insides firm up a smidge. If not, just proceed to the next step.
-
5Wrap burritos individually in foil or plastic wrap. (Actually, I find foil is better for reheating directly in the oven, but both work.) Pop into a freezer bag, label with a sharpie if you’re organized (I usually forget and play ‘what’s this burrito?’ later).
-
6When you’re ready to eat, either bake from frozen in foil at 375°F for about 30-35 minutes or microwave (unwrapped) for 3-4 minutes. If you want crispy tortillas, unwrap and bake the last 10 minutes. And yes, sometimes my microwave leaves a cold spot—just let it rest a minute and it sorts itself out.
Approximate Information for One Serving
Nutrition Disclaimers
Number of total servings shown is approximate. Actual number of servings will depend on your preferred portion sizes.
Nutritional values shown are general guidelines and reflect information for 1 serving using the ingredients listed, not including any optional ingredients. Actual macros may vary slightly depending on specific brands and types of ingredients used.
To determine the weight of one serving, prepare the recipe as instructed. Weigh the finished recipe, then divide the weight of the finished recipe (not including the weight of the container the food is in) by the desired number of servings. Result will be the weight of one serving.
Did you make this recipe?
Please consider Pinning it!