Let Me Tell You About My First Melopita (And Why the Kitchen Smelled Like Honey for a Week)
Oh, friend, you know those recipes that sound fancy but are actually just a hug in a baking dish? Melopita’s one of those for me. The first time I made Homemade Greek Melopita Honey Pie, I swear more honey ended up on my elbows than in the pie (note to self: do not answer the phone with sticky hands!). But all that mess was worth it when my family swooped in, forks at the ready, before it even cooled off. I mean, is there anything better than the smell of warm honey and cheese wafting through your kitchen? Maybe only if you add a fresh pot of coffee and a little gossip.
Why I Keep Making This (Besides the Obvious Honey Obsession)
I make this when I want something that’s not quite a cheesecake, not quite a custard, and definitely not as fussy as either (cheesecake water baths? No thanks!). My family goes absolutely nuts for melopita, especially my cousin Yianni, who claims it’s “almost as good as Grandma’s.” (I say almost because, let’s be honest, his standards are wild.) And if I’m in a rush, it’s so forgiving—once, I forgot to buy fresh ricotta, and it still worked out. You know those recipes that don’t make you want to pull your hair out? This is one. Although, sometimes the honey gets a mind of its own and goes everywhere—just warning you!
What You’ll Need (Plus Some Swaps & Old Family Quibbles)
- 400g fresh ricotta cheese (actually, my Grandma swore by mizithra, but honestly, ricotta’s easier to find and works just fine)
- 3 large eggs (room temp, unless you forget and just microwave them for a few seconds—don’t judge!)
- 1/2 cup good-quality honey (I use Greek thyme honey when I can; clover works in a pinch)
- 1/4 cup granulated sugar (sometimes I skip this if the honey’s super sweet)
- 2 tsp vanilla extract (I once used orange zest instead, and it made the whole thing taste like summer)
- Pinch of salt
- Zest of 1 lemon (or about a teaspoon—sometimes I just eyeball it)
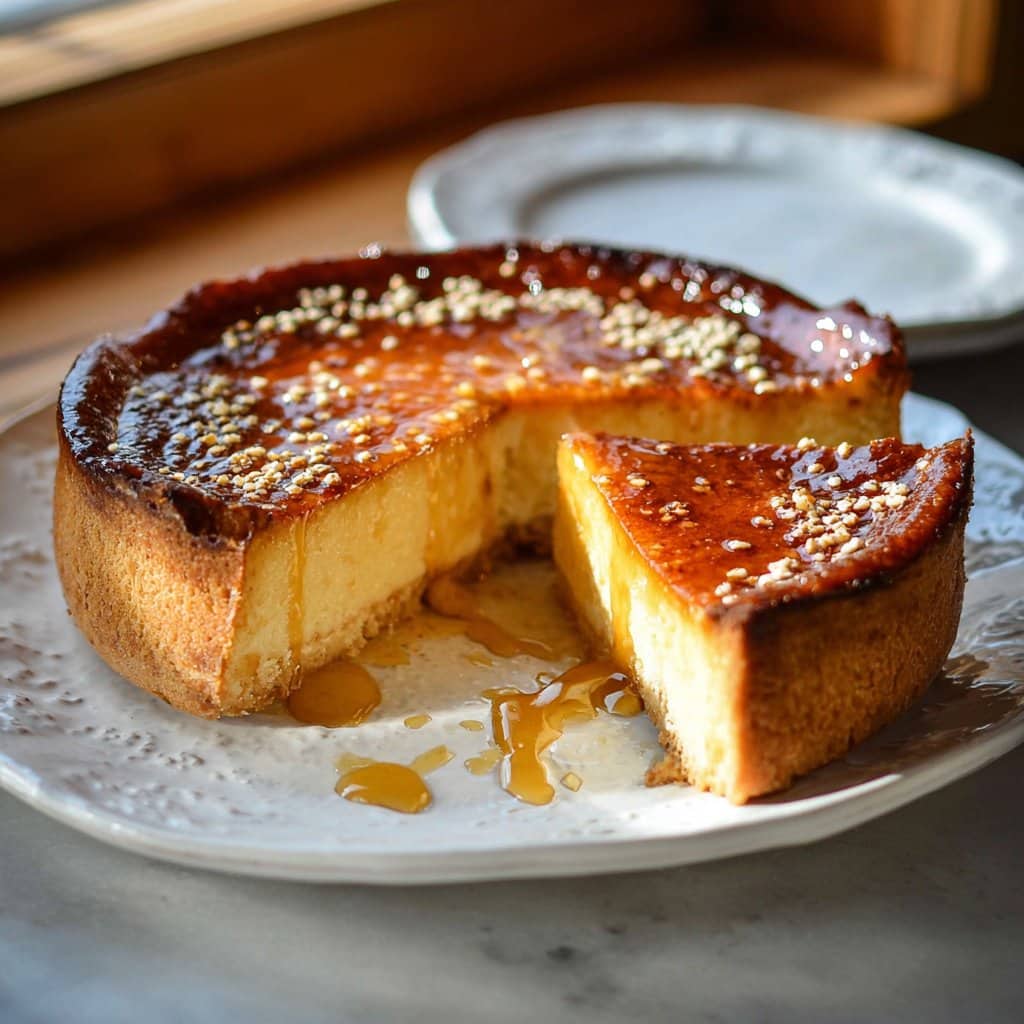
- Optional: a little cinnamon or a sprinkle of sesame seeds for topping (my aunt Niki insists on the sesame, but hey, you do you)
Let’s Make Melopita—Step-by-Step (With Tangents)
- Preheat your oven to 350°F (180°C). I never remember to do this first and then end up awkwardly waiting around, so—learn form my mistakes!
- Grab a 9-inch pie dish or cake pan. No pie dish? Use a brownie pan or even a deep ovenproof skillet. Grease it well (butter or a neutral oil; I just use whatever’s closest).
- In a big bowl, beat the ricotta until it’s smooth and creamy. If you’ve only got a fork, it’ll take a minute, but it’s totally doable. Don’t worry if it looks a bit grainy—mine always does at first.
- Crack in the eggs, pour in the honey, sugar, vanilla, salt, and lemon zest. Give it a good whisk (this is where I usually sneak a little taste—no shame). If you’re feeling bold, toss in some cinnamon now.
- Pour the mixture into your prepared pan. At this point, it doesn’t look like much—just trust the process.
- Optional: Sprinkle a dusting of cinnamon or sesame seeds over the top. Or both. Or none. I usually forget this step entirely and remember halfway through baking. It’s fine!
- Bake for about 40 to 45 minutes, until it’s set around the edges but still a little jiggly in the middle. (Don’t panic if it puffs up weirdly. It settles as it cools.)
- Let it cool for at least 30 minutes before slicing. Or don’t, but you’ll end up with a delicious mess. Not that I’d know…
Things I Learned (Sometimes the Hard Way)
- If you use too much honey, it tends to brown fast on top. I sometimes cover it with foil halfway if it’s getting aggressive.
- Letting it cool completely really does make slicing easier, but if you’re like me, you’ll just eat it with a spoon straight from the dish anyway.
- The leftovers (if you have any!) are amazing cold. Actually, I think this tastes better the next day.
Fun Variations (and One That Was Sort of a Disaster)
- Swap the ricotta for soft goat cheese for a tangy twist—my husband liked this, but the kids gave me side-eye.
- Drizzle some extra honey on top before serving, with a handful of crushed walnuts. Fancy, but not too fancy.
- I once tried folding in raspberries. Looks pretty, but the pie got super watery. Wouldn’t recommend unless you’re okay with it being more crumble than slice.
Tools I Use (But Here’s a Shortcut If You Don’t Have Them)
- A pie dish or cake pan (already mentioned, but, you know, sometimes people skim)
- Mixing bowl (I’ve used a soup pot in a pinch—no one’s judging)
- Whisk or sturdy fork (hand mixer makes it smoother, but total overkill here)
- Zester or grater for the lemon (if you don’t have one, just peel a bit and chop super fine—it’s not the end of the world)
How I Store Melopita (Or, How I Would If It Ever Lasted)
Technically, you should store it in the fridge, covered, and it keeps for up to 3 days. But honestly, in my house it never lasts more than a day! If you want to freeze it, wrap slices well—though I’d probably just eat it fresh, if I’m honest.
Serving It Up (My Favorite Part)
I love serving melopita slightly warm with a little extra honey on top and sometimes a dollop of thick Greek yogurt on the side. My uncle likes his with a shot of espresso, but I’m more of a tea person. Oh, and if you’ve got fresh berries, scatter them on top—looks super pretty.
Pro Tips I Learned the Hard Way
- Don’t rush the cooling step. I once tried to slice it straight out of the oven and it just collapsed everywhere. Still tasty, but a hot mess—literally.
- Go easy on the lemon zest—too much and it goes from sunny to soapy. Trust me, I learned the hard way.
FAQ: Honest Answers (Because You Actually Asked!)
- Can I use cream cheese instead of ricotta?
Technically you can, but the texture will be much denser; personally, I’d only do this if you’re desperate and can’t get ricotta (and maybe add a splash of milk). - My pie cracked on top. Did I ruin it?
Nope! It’ll still taste fab. Actually, sometimes I think the cracks make it look rustic and homemade—plus, more nooks for honey to seep in. - Can I make this gluten free?
You bet—there’s no flour in the base recipe anyway. If you want a crust, use a gluten-free one (or skip it entirely, which is what I usually do). - Where can I find Greek honey?
I usually order mine from Salamina or check a Mediterranean grocery nearby. But again, any good honey works—don’t overthink it. - Is this meant to be super sweet?
It’s sweet, but not tooth-achingly so. If you want it sweeter, just drizzle more honey when serving. Easy fix.
And hey, if you end up with a sticky kitchen, welcome to the club. Hope you love this as much as we do—let me know how it turns out! Or, you know, just drop by for a slice if you’re in the neighborhood.

Ingredients
- 500 g ricotta cheese (or Greek mizithra cheese)
- 120 g honey, plus extra for serving
- 3 large eggs
- 60 g granulated sugar
- 1 teaspoon vanilla extract
- Zest of 1 lemon
- 2 tablespoons all-purpose flour
- 1/4 teaspoon ground cinnamon (optional), plus extra for dusting
Instructions
-
1Preheat your oven to 180°C (350°F). Grease a 23 cm (9-inch) pie dish or springform pan.
-
2In a large bowl, combine the ricotta cheese, honey, sugar, eggs, vanilla extract, lemon zest, and flour. Mix well until smooth and creamy.
-
3Pour the mixture into the prepared pie dish and smooth the top with a spatula. Sprinkle with ground cinnamon if desired.
-
4Bake for 35-40 minutes, or until the pie is set and lightly golden on top. The center should be just firm.
-
5Allow the Melopita to cool to room temperature. Drizzle with extra honey and a dusting of cinnamon before serving.
Approximate Information for One Serving
Nutrition Disclaimers
Number of total servings shown is approximate. Actual number of servings will depend on your preferred portion sizes.
Nutritional values shown are general guidelines and reflect information for 1 serving using the ingredients listed, not including any optional ingredients. Actual macros may vary slightly depending on specific brands and types of ingredients used.
To determine the weight of one serving, prepare the recipe as instructed. Weigh the finished recipe, then divide the weight of the finished recipe (not including the weight of the container the food is in) by the desired number of servings. Result will be the weight of one serving.
Did you make this recipe?
Please consider Pinning it!!




