Pull Up a Chair—Let’s Make Mini Pumpkin Cheesecakes
Alright, so let me just quickly say: if you came looking for perfectly styled pumpkin cheesecake bites that’ll make you an Instagram star—well, you might be in for a delicious surprise instead. These Mini Pumpkin Cheesecakes are the dessert I bring to nearly every fall get-together (my friend Tara claims she only invites me for these; she’s only half joking). The first time I made them, I was running late to a potluck and accidentally whacked the mixer bowl—pumpkin splat everywhere—so now, every time I smell pumpkin and cream cheese together, my kitchen floor gets a little nervous. But hey, they turned out so tasty that day, I’ve been tweaking and loving them ever since.
Why I Keep Coming Back to This Recipe
I make these every autumn because, honestly, even folks who say “I’m not a pumpkin person” end up sneaking seconds. My family goes bananas (wait, is that mixing metaphors?) for them. If you’ve got little helpers in the kitchen, they’re perfect for small hands to press down the cookie crust—though, be warned, you might lose a few cookies to sneaky snacking. Oh, and I used to think making anything with a cheesecake label would mean heartbreak and cracks everywhere—but with these mini guys? Not a worry.
Gather These Ingredients—It’s More Flexible Than You Think
- 12 whole graham crackers, crushed (or, honestly, any biscuit-like cookie works—I’ve even used ginger snaps when I was out of grahams; not bad!)
- 3 tbsp melted butter (salted, unsalted? Whatever you like. I’ve used coconut oil in a pinch, though it does get a bit coconutty.)
- 2 packs (16 oz total) cream cheese, softened (My grandmother swore by Philadelphia, but the store brand isn’t bad, especially if it’s on offer)
- 3/4 cup granulated sugar (sometimes I go with a generous half cup, just depends if I’m being a bore about sugar that week)
- 2 large eggs (room temp, but I’ve used them cold and just beat them longer—don’t stress)
- 3/4 cup pumpkin puree (canned is fine, but if you went rogue and roasted your own—more power to you!)
- 1 tsp vanilla extract (I’ve forgotten it once; nobody noticed)
- 1.5 tsp pumpkin pie spice (or a mashup of cinnamon, nutmeg, and ginger—maybe a pinch of cloves if you’re wild)
- Pinch of salt (because, trust me, it brings out the flavor)
Here’s How I Do It (And Some Bits Where I Veer Off Script)
- Get your gear ready. Preheat the oven to 325°F (165°C). Line a 12-cup muffin tin with paper liners—though if you run out, just grease the pan well (I’ve pried a few stuck ones out, no shame).
- Make the crust. Mix those crushed grahams with melted butter and a sprinkle of sugar if you like it sweet. Spoon a heaped tablespoon into each muffin liner and press down firmly (I use the bottom of a spice jar; fingers work fine). This is where I usually snack on crumbs too.
- Whip the filling. In a bowl (stand or hand mixer, or a solid bicep workout if you’re old-school), beat the cream cheese until it’s dreamy and smooth. Add sugar and a pinch of salt, blend again. Crack in the eggs, but just mix until combined—overmixing equals puffy cheesecakes, which I learned the wonky way.
- Pumpkin time! Beat in pumpkin puree, vanilla, and pumpkin spice. Scrape down the sides just when it looks a little swirly-taxidermy, don’t panic; it smooths out when baked. (At this point—I’ll admit—I usually dip a finger in for a taste. Shh.)
- Spoon and smooth. Divide the filling among the crusts. Give the tin a gentle tap on the counter to settle things (and get out air bubbles—learned that one the hard way when mine looked like the moon once).
- Bake for 18-22 minutes. Centers should be a bit wobbly. Pull them out and let cool in the pan for 15 minutes (they’ll deflate a smidge, totally normal). Then chill in the fridge for at least 2 hours or, honestly, overnight if you can hold off.
My Scribbled Notes (AKA Learn From My Weirdness)
Sometimes I zap the crusts in the oven for 4 minutes before filling—makes them crispier. Also, if your cream cheese is still a bit chilly, let it sit near the preheating oven while you do other stuff; softens right up. Oh, and if the tops crack? Just pile on whipped cream, and nobody’s the wiser (or, as my aunt says, “You eat with your mouth, not your eyes”).
If You Want To Tinker—Variations I’ve Actually Tried
I tried swirling a dab of caramel sauce into the tops before baking—messy but so good. Once I tried a chocolate cookie base instead of graham, and that was… let’s call it a learning moment (they sorta fell apart, tasted fine though). Sometimes I add chopped pecans to the crust or even a bit of bourbon in the mix—it’s a crowd waker-upper.
Don’t Sweat the Equipment Stuff
Muffin tins are great (obviously), but I have once made these in mini ramekins when everything else was dirty. If you don’t have a mixer? An old-school whisk and some elbow grease totally works. The time my mixer broke, I used a fork—took a while but, hey, worked.

Will They Last? (Not Around Here…)
These’ll keep in the fridge for up to 4 days in a sealed container, but honestly? Good luck—ours rarely make it past breakfast the next day. You can freeze them (wrap individually), then thaw in the fridge before serving. But again, they disappear quick.
How I Serve ‘Em (Sometimes With a Twist)
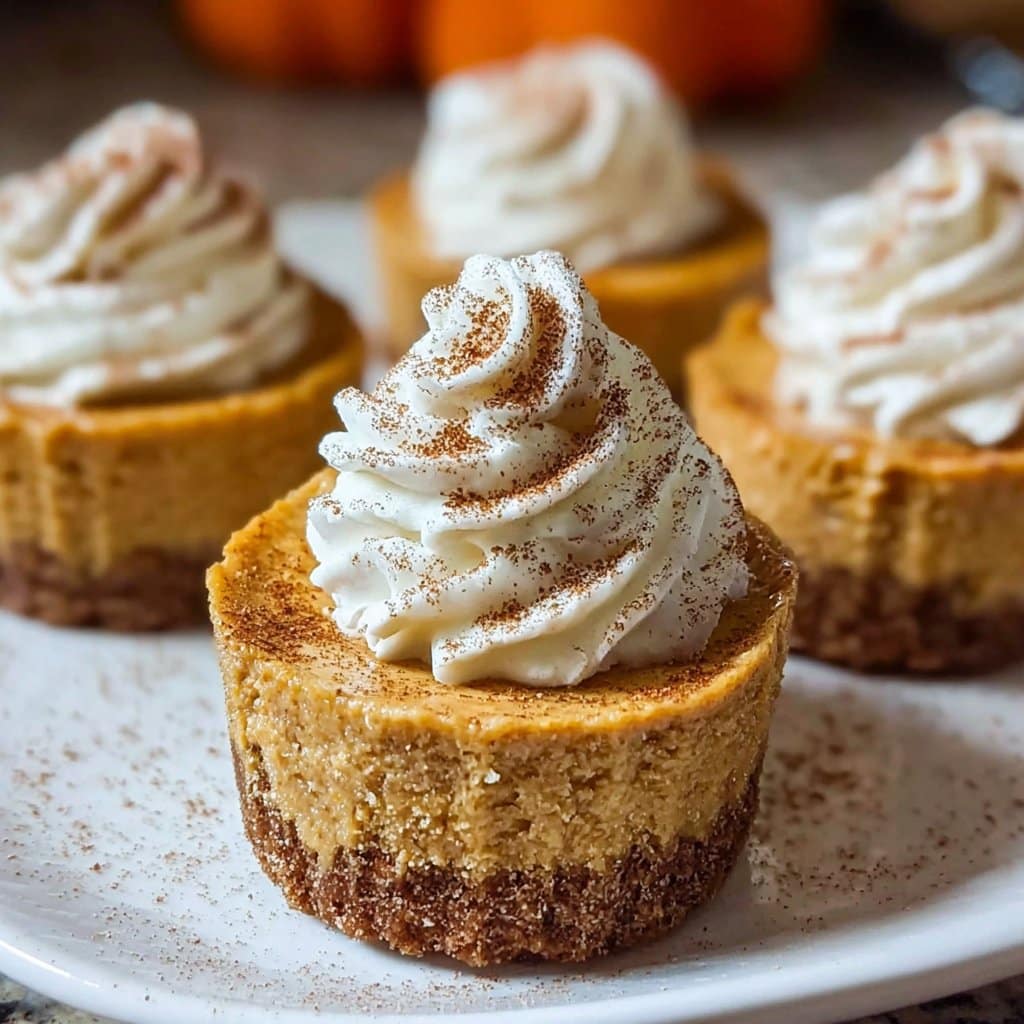
My favorite: top with whipped cream and just a sprinkle of cinnamon. My brother goes for a drizzle of maple syrup and a few toasted pecans—totally over the top, but worth it. And sometimes, for a “grown up” party, I mix a teaspoon of bourbon into the topping; not too much, just enough to make it interesting (and slightly dangerous for weekday breakfasts!).
A Few Lessons From Goofs Past—Pro Tips
I once thought I could hurry cooling by popping them right in the freezer—hello, soggy crust. Now, I just let them hang out at room temp before chilling. Also? Don’t overbeat the batter; it honestly makes them puff up weird then sink (learned that form watching Sally’s video tutorial—she’s got good tips, by the way).
Mini Pumpkin Cheesecakes: Stuff People Actually Ask Me
Do I have to use pumpkin puree or can I try squash?
Heck yes! I mean, I have subbed pureed butternut squash before when the store was out of pumpkin. Maybe a touch sweeter, but no one noticed.
My cheesecakes cracked! Did I ruin them?
Pssh. Not at all. Just cover with whip or fruit. Actually, a little crack shows they’re homemade, right?
Can I make these gluten-free?
Totally. Use gluten-free cookies or try these GF grahams. The filling’s fine as is.
Can I double the recipe?
Yup! Just use two pans or bake in batches. Though, warning: your friends will expect this level of effort every single fall after.
Honestly, let me know if you hit any weird snags—I probably have, too. Let me know how it goes, and if you invent a killer variation, don’t keep it a secret. Oh, and speaking of variations, if you like other cheesecake flavors, check out this roundup for more ideas.
Happy baking, and may your kitchen floor stay pumpkin-free!
Ingredients
- 1 cup graham cracker crumbs
- 3 tbsp unsalted butter, melted
- 8 oz cream cheese, softened
- 1/3 cup granulated sugar
- 1/2 cup canned pumpkin puree
- 1 large egg
- 1/2 tsp ground cinnamon
- 1/4 tsp ground nutmeg
- 1/4 tsp vanilla extract
- Pinch of salt
- Whipped cream, for topping (optional)
Instructions
-
1Preheat oven to 325°F (160°C). Line a 12-cup muffin tin with paper liners.
-
2In a small bowl, mix graham cracker crumbs and melted butter until combined. Press about 1 tablespoon of the mixture into the bottom of each liner.
-
3In a medium bowl, beat cream cheese and sugar until smooth. Add pumpkin puree, egg, cinnamon, nutmeg, vanilla extract, and salt. Mix until well combined.
-
4Divide the cream cheese mixture evenly among the liners, filling almost to the top.
-
5Bake for 20-22 minutes, or until centers are set. Let cool completely, then refrigerate for at least 1 hour before serving.
-
6Top with whipped cream before serving if desired.
Approximate Information for One Serving
Nutrition Disclaimers
Number of total servings shown is approximate. Actual number of servings will depend on your preferred portion sizes.
Nutritional values shown are general guidelines and reflect information for 1 serving using the ingredients listed, not including any optional ingredients. Actual macros may vary slightly depending on specific brands and types of ingredients used.
To determine the weight of one serving, prepare the recipe as instructed. Weigh the finished recipe, then divide the weight of the finished recipe (not including the weight of the container the food is in) by the desired number of servings. Result will be the weight of one serving.
Did you make this recipe?
Please consider Pinning it!!



