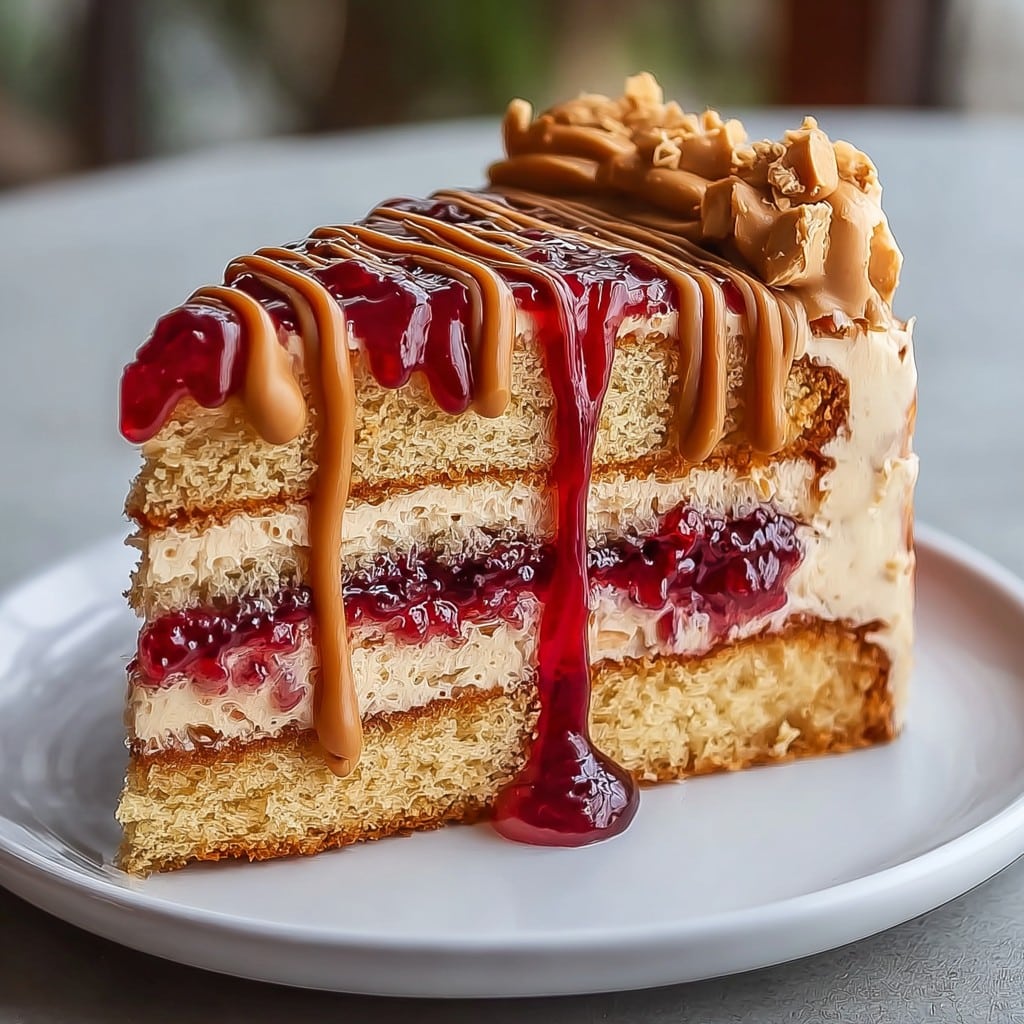
So, Here’s the Deal with My Peanut Butter & Jelly Cake
Okay, straight up—I never planned on making a Peanut Butter & Jelly Cake until my youngest declared we HAD to try it after some YouTube video (kids, right?). Next thing you know, it’s become one of those “let’s celebrate Friday!” kind of cakes. I’ve turned my kitchen into a semi-controlled chaos zone more than once for this, but honestly? All worth it for that sticky, happy, ridiculous first bite. Full confession: I once dropped half the batter (don’t ask), and we still ate it—just called it “rustic!”
Why You’ll Love This (Or At Least Laugh About It)
I pull this one out when I want to impress my friends, but also when I just want to relive the nostalgia—peanut butter and jelly is such a lunchbox classic, I can’t even. My family basically turns into cake-stealing ninjas as soon as it’s cool enough to handle (usually before, let’s be real). Also, if you’re a peanut butter addict like me, you’ll wanna eat the batter with a spoon; but, uh, don’t do that—or do, I’m not judging (just maybe save some for the actual cake?).
Alright, What You’ll Need (and What You Can Fake)
- 1 1/2 cups (about 190g, but I eyeball it sometimes) plain flour—whole wheat in a pinch works okay, just a bit denser
- 1/2 teaspoon baking powder
- 1/2 teaspoon baking soda
- Big pinch of salt
- 1/2 cup (about 125g) unsalted butter—softened, but I’ve melted it in desperation and it’s fine
- 3/4 cup creamy peanut butter—you could use crunchy, but be prepared for bumpy slices. My Gran swore by that classic supermarket brand, but really, whatever’s in your jar
- 1 cup sugar (I sometimes use light brown sugar for a whisper of caramel)
- 2 large eggs (room temp, give or take. If you forget, just run ‘em under warm water for a sec)
- 1 teaspoon vanilla extract—don’t skip this, but imitation kinda works if you’re in a bind
- 1/2 cup plain yoghurt or sour cream—seriously, either works. Once I used Greek yoghurt, tasted extra tangy
- 1/2 cup milk—whatever type you’ve got
- About 3/4 cup of your favorite jelly or jam (grape and raspberry are hits here, but my friend tried marmalade and, um, it wasn’t my thing)
How I Actually Make This Cake
- Preheat & Prep: First, yank your oven on to about 175°C (350°F). Butter up a round 8-inch cake pan, or, you know, line it with parchment if you’re low on elbow grease. (I’ve been known to skip greasing and just eat the bits that get stuck. Life’s too short).
- Mixing the Dry Bits: Whisk together your flour, baking powder, baking soda, and salt in a bowl. If you toss in too much baking soda by accident, just keep going—I honestly think it only makes the cake puff up more sometimes.
- Butter, Sugar, PB Time: Beat the softened butter, sugar, and peanut butter together until fluffy-ish. I usually let my mixer do the heavy lifting, but once I did it by hand and had a forearm workout for days. (This is where I sneak a fingerful…)
- Add Eggs & Vanilla: Crack in the eggs one at a time, then hit it with the vanilla. If it looks a bit split or weird, don’t worry; it’s all going to come together, promise.
- Add Wet and Dry: Now, take turns adding the flour mixture and the yoghurt (or sour cream) to your bowl. Example: a little flour, half the yoghurt, more flour, the last of the yoghurt, then finish with the flour. Glorious mess.
- Milk It Up: Pour in the milk. If your batter looks a bit runny, don’t panic—mine sometimes does, and it’s always fine.
- Layer & Swirl: Spread about two-thirds of the batter into your cake pan. Dollop your jam/jelly in big spoons, swirl it around a bit (I just drag a butter knife through—artistic, right?). Top with the rest of the batter and swirl a little more for luck.
- Bake: Pop it in the oven for about 35-40 minutes, or until a toothpick comes out clean-ish. Sometimes the jelly sticks, so just check the cake part.
- Cool (Or Try To): Let it cool in the pan… or, if you’re like me, dig into a warm, jammy corner while it’s still a bit molten.
Some Notes I Learned By Messing Up
- The cake tastes even better the next day. But it’s usually gone by then, so who really knows.
- I once tried doubling the jelly—looked beautiful, but leaked everywhere. Stick to the amount.
- If you only have a 9-inch pan, your cake’ll be thinner. Just check it 5 minutes earlier.
Oh, About Variations… Not All Are Winners
- I tried this with almond butter and apricot jam—kind of amazing, actually.
- Once I swirled chocolate chips on top. Kids lost their minds, but it’s not super PB&J-ish anymore.
- Don’t use low-sugar jelly. Cake ends up bland (live and learn).
Gear! Or What I End Up Using
- Electric mixer. But a good old wooden spoon and some patience does the trick.
- 8-inch cake tin. Or borrow whatever’s closest in size, but watch your bake time.
- If you’re without parchment, I’ve greased with butter AND a sprinkle of flour—works a treat.
Storing This Beauty (If You Somehow Have Leftovers)
Keep in an airtight container. Room temp is fine for a couple days; fridge works for up to 4, but honestly, it’s never lasted more than a day in my house. Oh—don’t wrap it too tight while warm or it goes weird and soggy. Learned that the hard way.
How We Serve It (Warning: May Cause Arguments)
It’s great with just a dusting of icing sugar and mugs of builder’s tea, but my lot goes all in with a scoop of vanilla ice cream. Sometimes I toast slices the next morning with extra jelly—it’s bonkers, but you should try. Have you ever microwaved cake for just a few seconds? Turns it gooey, and that’s perfection in my book.
If I Could Go Back in Time: Pro Tips
- Don’t rush the creaming step—once, I did, and the cake was a bit rubbery. Take your time. Put on a podcast, maybe.
- Actually, it works better if you mix the dry and wet in batches, like I wrote above (I used to dump everything together and wonder why it wouldn’t rise—oops).
- Don’t over-swirl the jam, or you’ll lose the pretty layers. There.
FAQ (Because People Really Do Ask Me These)
- Does it work with natural peanut butter?
- Yep, but the texture turns out a bit crumblier; just make sure to mix it well so you don’t get any weird oil patches.
- Can I make this as cupcakes?
- Definitely! Bake for about 18-20 minutes. They’re adorable, though honestly, I prefer just one big messy cake (less fiddling).
- What about nut allergies?
- So, I have a pal who swaps in sunflower butter. Not quite the same, but it’s close—and safer for some!
- What jelly flavor is best?
- I say grape or raspberry, but hey, go wild. Blueberry works (see this breakdown on jelly vs. jam vs. preserves). If you’re into weird combos, check out Smitten Kitchen’s jam cake experiments.
Sometimes I wonder why we call it jelly when it’s jam, but that’s one of those debates for another day…

Ingredients
- 2 1/2 cups all-purpose flour
- 1 tablespoon baking powder
- 1/2 teaspoon salt
- 3/4 cup unsalted butter, softened
- 1 cup creamy peanut butter
- 1 1/2 cups granulated sugar
- 4 large eggs
- 1 cup whole milk
- 1 teaspoon vanilla extract
- 3/4 cup fruit jam or jelly (such as strawberry or grape)
- 2 cups powdered sugar (for frosting)
- 1/4 cup creamy peanut butter (for frosting)
- 1/4 cup unsalted butter, softened (for frosting)
- 2–3 tablespoons milk (for frosting)
Instructions
-
1Preheat the oven to 350°F (175°C). Grease and flour two 8-inch round cake pans.
-
2In a medium bowl, whisk together the flour, baking powder, and salt. Set aside.
-
3In a large bowl, beat together the softened butter, peanut butter, and sugar until creamy. Add eggs one at a time, beating well after each. Mix in vanilla extract.
-
4Alternately add the flour mixture and milk to the peanut butter mixture, beginning and ending with the flour. Mix until just combined.
-
5Divide the batter between the prepared pans. Bake for 30–35 minutes, or until a toothpick inserted in the center comes out clean. Cool cakes in pans for 10 minutes, then transfer to a wire rack to cool completely.
-
6For the frosting, beat together the powdered sugar, peanut butter, and butter. Add milk a tablespoon at a time until you reach a smooth, spreadable consistency. Place one cake layer on a serving plate, spread with jam or jelly, top with second cake layer, and frost the cake with peanut butter frosting.
Approximate Information for One Serving
Nutrition Disclaimers
Number of total servings shown is approximate. Actual number of servings will depend on your preferred portion sizes.
Nutritional values shown are general guidelines and reflect information for 1 serving using the ingredients listed, not including any optional ingredients. Actual macros may vary slightly depending on specific brands and types of ingredients used.
To determine the weight of one serving, prepare the recipe as instructed. Weigh the finished recipe, then divide the weight of the finished recipe (not including the weight of the container the food is in) by the desired number of servings. Result will be the weight of one serving.
Did you make this recipe?
Please consider Pinning it!!




