Hey There! Ready for Heart-y Cupcakes?
So, let me set the scene: it’s nearly Valentine’s Day, my daughter’s class party is looming, and I (overambitiously, can we all just admit?) volunteer to bring a treat. My first go at these heart-shaped cupcakes was chaotic—at least two stuck to the pan, one looked more like a potato if I’m honest, but the giggles and frosting everywhere made it totally worth it. Now it’s one of those things I do every February, and—confession—sometimes just because it’s a Tuesday and we need a bit of fun. Anyway, if you’re in the mood for baking that’s more about love and less about perfection, grab your apron, maybe pour a mug of tea, and let’s make a little sweet magic.

Why I Keep Making These Heart-Shaped Cupcakes
I make these when my family is craving something cute (and honestly, they eat with their eyes first). Or when I want to feel a bit like Martha Stewart but with less stress. My kids go absolutely bonkers for these, half because they’re heart-shaped and half because I let them drown them in sprinkles. Plus, the recipe’s forgiving—like, you can mess up the shape a bit and once they’re frosted no one cares! Once, the batter overflowed into organic blobs, but we still devoured them. And if you’re the type who likes sneaking a taste of the batter, you’re in good company—I do it every single time.
What You’ll Need (With My Annotations!)
- 1 1/2 cups (180g) all-purpose flour (whole wheat works in a pinch, but I prefer the classic stuff for fluffiness)
- 1 cup sugar (my gran uses caster, but truly any white sugar is fine)
- 1/2 cup unsalted butter, softened (if you only have salted, just dial back your pinch of salt later)
- 2 large eggs
- 1/2 cup milk—I sometimes swap in buttermilk for a tiny tang
- 2 tsp vanilla extract (the cheap stuff is fine—I’m not fancy and no one’s noticed)
- 2 tsp baking powder
- 1/4 tsp salt
- Red food coloring (I always guesstimate, a few drops until it looks Valentine-y)
- Frosting of your choice (store-bought if you’re in a rush, or homemade if you’re in the zone)
- Cupcake liners
- 12 marbles or crumpled foil balls (for shaping hearts—promise I’ll explain)
How To Do It: My Not-Exactly-Scientific-Method
- Start by preheating your oven to 350°F (175°C). Pop your liners into a standard cupcake tray.
- Here’s my secret: to get the heart shape, put a marble (or a tightly wadded up ball of foil, if you’re like me and half the marbles have run away) between the liner and the pan at the top edge. Makes a dent and, magically, a heart shape forms as they bake!
- In a big bowl, cream together the sugar and butter until it’s fluffy. This is where I almost always forget if I’ve measured the butter right, but honestly, a bit more or less isn’t life-altering.
- Crack in the eggs one at a time. Beat well after each, but don’t overthink it. Add the vanilla in here. (Sometimes I get sidetracked midway and the eggs get a bit cold—never seemed to matter much.)
- Toss together the flour, baking powder, and salt in another bowl. No need to sift unless you’re feeling fancy.
- Now, add your dry mix to the wet stuff in three goes, alternating with the milk. (Start and end with flour if you want to be all pro.) Don’t overmix or the cupcakes might be tough—unless you’re going for bicep cupcakes. Then go wild.
- Here’s where I add food coloring: stir it in until your batter is as pink or red as you like. Sometimes I do streaks by barely mixing it in—artsy, right?
- Spoon the batter into your liners, about two-thirds full. Don’t panic if it’s a bit messy, or if the marble shifts. I usually fix at least two at this stage.
- Bake for 17-20 minutes. They’re done when a toothpick poked in the center comes out clean, but if you see a few crumbs, it’s okay. Every oven’s a bit different—my old one cooked these in about 15 minutes flat and my new one takes for-ever.
- Let them cool in the tray for five minutes, then move them onto a rack. Be careful! The marbles/foil are hot (yes, learned this the hard way…)
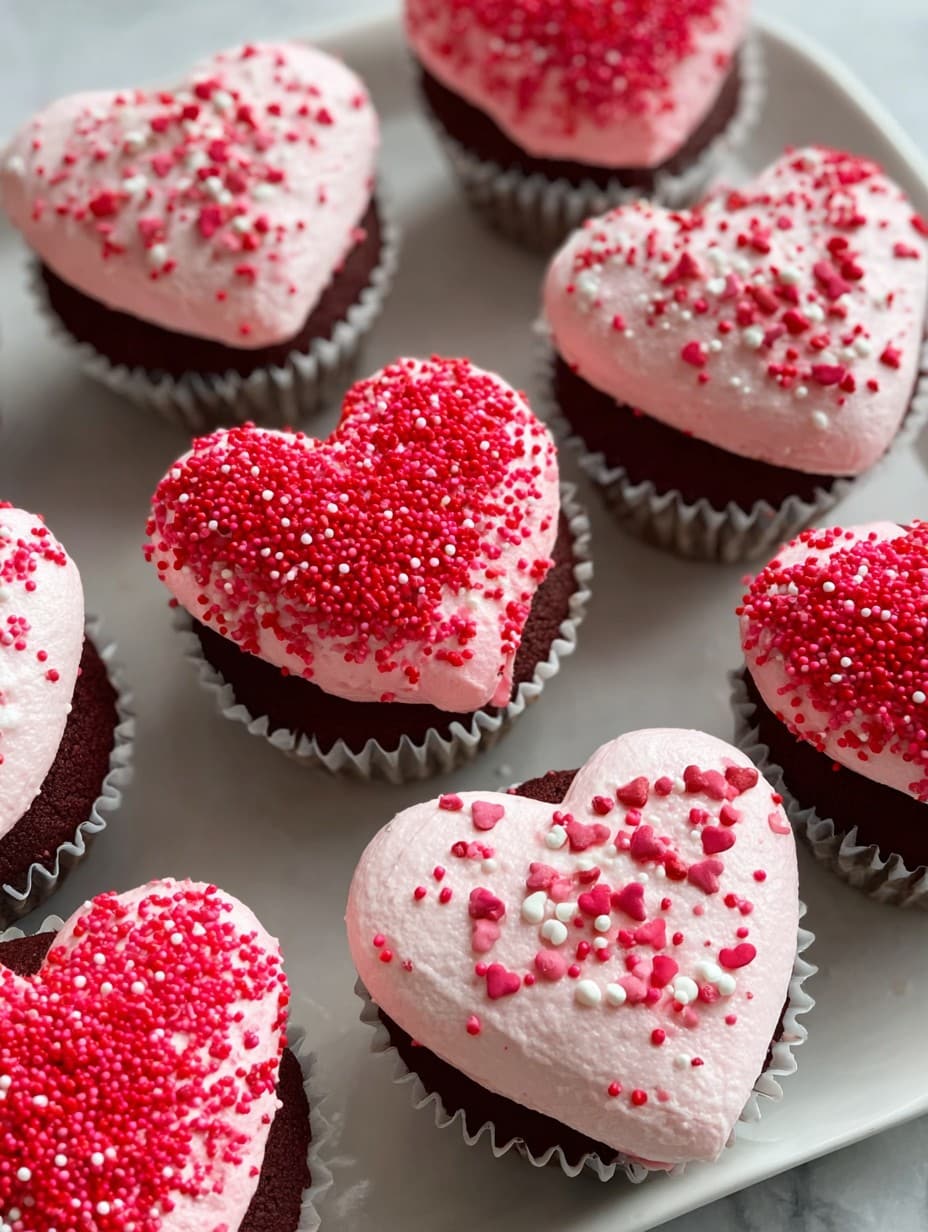
- Once they’re cool, frost away. I go wild with pink buttercream and heaps of sprinkles. Kids help, and chaos ensues—in a fun way.
Things I’ve Learned (Usually the Long Way)
- Don’t skip the liners unless scrubbing pans is your idea of a good time.
- If the food coloring is too mild, they bake up orange-y. Add more and cross your fingers.
- I thought silicone pans would be easier, but actually, they made my hearts sort of blobby. Metal pans + liners + marbles = your best bet (in my opinion, anyway).
Some Variations I’ve Messed Around With
- Tried subbing cocoa for some flour for “red velvet”–not quite right, bit too dry for me, actually.
- Swapping half the milk for strawberry puree gives pinkies a real berry flavor—really tasty.
- Mini chocolate chips—sometimes they sink, but who’s complaining?
- On second thought, I once tried using jam as a swirl mid-bake… looked cool, tasted odd (maybe don’t bother)
Equipment… Or, Improvise As Needed
- Standard cupcake pan (if you only have a muffin tray, works fine, just fill a bit less)
- Electric hand mixer or just a strong arm and a whisk—cake’s always better with elbow grease anyway
- Mixing bowls, spoons, the usual suspects
- Marbles or foil balls (no marbles? I’ve literally used glass pebbles from a flower vase before—just wash them well!)
Storing & My Two Cents
Store these in an airtight container at room temp—should be good a couple of days. But in my house, ha, they’re usually gone by morning, especially if there’s extra frosting. If it’s hot, stick them in the fridge, but honestly, room temp keeps them softer (I think they taste even better the next day, but don’t quote me)
How I Like To Serve ‘Em
We pile them onto a big plate and put them smack dab in the middle of the table. I sometimes add some fresh strawberries for good measure (or to make me feel less bad about the sugar rush). And, a nice mug of tea or milk on the side. If it’s a party, a few silly napkins always bring a grin.
Pro tips, or What I Learned The Hard Way
- I once tried rushing the cooling (impatient, me?), and the frosting just slid off like a bobsled—wait till they’re cool.
- Don’t overmix the batter. If you get a bit carried away, the texture isn’t bad per se, just kind of chewy. Not my thing.
- Actually, for brightly colored cupcakes, less batter in each cup (more rise, better hearts) works better—learned that after a few flat-toppers.
FAQ (Yes, I’ve Actually Heard These)
- Can I use a boxed cake mix? Yup, and honestly, some days I do. Skip to the fun part: shaping and decorating. Nobody judges here!
- What if I don’t have marbles or foil? Hmm, try clean glass beads from a plant pot, or even those stones for fish tanks (as long as they’re oven safe!) Just don’t use anything plastic—smelly disaster, trust me.
- Do they freeze well? Yes, although the shape’s a smidge less defined after thawing, but still adorable, still tasty.
- What’s the best frosting? Ooh, I waffle between classic vanilla buttercream and a quick cream cheese. But, canned stuff works a charm when you’re low on patience.
- Mine don’t look like hearts—help? Happens all the time! Sometimes I poke the cupcake gently with a spoon while they’re still warm and nudge the ‘heart’ indent. Or just pile on extra decorations and act like you meant it. No one’s the wiser.
- Can I double this recipe? You bet, but use two trays or bake in shifts—the oven can get crowded.
Hope you enjoy making these as much as I do, even when life gets a bit messy (or the cupcakes do). Happy baking, mate!
Ingredients
- 1 1/2 cups all-purpose flour
- 1 cup granulated sugar
- 1/2 cup unsalted butter, softened
- 2 large eggs
- 1/2 cup whole milk
- 1 1/2 teaspoons baking powder
- 1 teaspoon vanilla extract
- 1/4 teaspoon salt
- 1 cup unsalted butter (for frosting), softened
- 2 cups powdered sugar
- 2 tablespoons heavy cream
- Red or pink food coloring
- Heart-shaped cupcake liners or marbles
Instructions
-
1Preheat the oven to 350°F (175°C) and line a cupcake pan with heart-shaped liners or place a marble between the liner and pan to create a heart shape.
-
2In a large bowl, cream together the butter and sugar until light and fluffy. Beat in eggs, one at a time, then stir in vanilla extract.
-
3In a separate bowl, whisk together flour, baking powder, and salt. Gradually add the dry ingredients to the wet ingredients, alternating with milk. Mix until just combined.
-
4Spoon batter into prepared cupcake liners, filling each about two-thirds full. Bake for 18-20 minutes, or until a toothpick inserted comes out clean. Let cupcakes cool completely.
-
5To make the frosting, beat butter in a bowl until creamy. Gradually add powdered sugar, then mix in heavy cream and food coloring until desired color and consistency are reached.
-
6Frost the cupcakes with the pink buttercream and decorate as desired. Serve and enjoy!
Approximate Information for One Serving
Nutrition Disclaimers
Number of total servings shown is approximate. Actual number of servings will depend on your preferred portion sizes.
Nutritional values shown are general guidelines and reflect information for 1 serving using the ingredients listed, not including any optional ingredients. Actual macros may vary slightly depending on specific brands and types of ingredients used.
To determine the weight of one serving, prepare the recipe as instructed. Weigh the finished recipe, then divide the weight of the finished recipe (not including the weight of the container the food is in) by the desired number of servings. Result will be the weight of one serving.
Did you make this recipe?
Please consider Pinning it!!




